自定义 Python 运算符
你将学到什么
-
如何将用 Python 编写的自定义算子集成到 PyTorch 中
-
如何使用
torch.library.opcheck测试自定义算子
先决条件
- PyTorch 2.4 或更高版本
PyTorch 提供了大量操作张量的运算符库(例如 torch.add、torch.sum 等)。然而,您可能希望在 PyTorch 中使用一个新的自定义运算符,可能是由第三方库编写的。本教程展示了如何包装 Python 函数,使其行为类似于 PyTorch 的原生运算符。您可能希望在 PyTorch 中创建自定义运算符的原因包括:
-
将任意 Python 函数视为与
torch.compile无关的不透明可调用对象(即防止torch.compile追踪到该函数内部)。 -
为任意 Python 函数添加训练支持
使用 torch.library.custom_op() 来创建 Python 自定义操作符。使用 C++ 的 TORCH_LIBRARY API 来创建 C++ 自定义操作符(这些 API 可以在没有 Python 的环境中使用)。更多详细信息请参见 自定义操作符介绍页面。
请注意,如果您的操作可以通过现有 PyTorch 操作符的组合来表达,那么通常不需要使用自定义操作符 API——所有功能(例如 torch.compile、训练支持)应该都能正常工作。
示例:将 PIL 的裁剪功能封装为自定义操作符
假设我们正在使用 PIL 的 crop 操作。
importtorch
fromtorchvision.transforms.functionalimport to_pil_image, pil_to_tensor
importPIL
importIPython
importmatplotlib.pyplotasplt
defcrop(pic, box):
img = to_pil_image(pic.cpu())
cropped_img = img.crop(box)
return pil_to_tensor(cropped_img).to(pic.device) / 255.
defdisplay(img):
plt.imshow(img.numpy().transpose((1, 2, 0)))
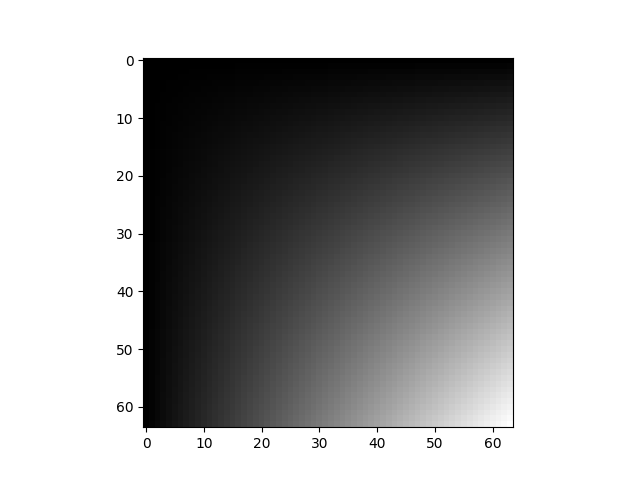
img = torch.ones(3, 64, 64)
img *= torch.linspace(0, 1, steps=64) * torch.linspace(0, 1, steps=64).unsqueeze(-1)
display(img)

cropped_img = crop(img, (10, 10, 50, 50))
display(cropped_img)

crop 在 torch.compile 中并没有得到有效的开箱即用支持:torch.compile 会在无法处理的函数上引发 “图断点”,而图断点会对性能产生不利影响。以下代码通过引发错误(torch.compile 在 fullgraph=True 时如果发生图断点会引发错误)来展示这一点。
@torch.compile(fullgraph=True)
deff(img):
    return crop(img, (10, 10, 50, 50))

# The following raises an error. Uncomment the line to see it.
# cropped_img = f(img)
为了让 crop 作为黑盒函数与 torch.compile 一起使用,我们需要完成两件事:
-
将该函数封装为一个 PyTorch 自定义运算符。
-
为运算符添加一个“
FakeTensor内核”(也称为“元内核”)。给定一些FakeTensors输入(没有存储的虚拟张量),该函数应返回您选择的虚拟张量,并具有正确的张量元数据(形状/步幅/dtype/设备)。
fromtypingimport Sequence

# Use torch.library.custom_op to define a new custom operator.
# If your operator mutates any input Tensors, their names must be specified
# in the ``mutates_args`` argument.
@torch.library.custom_op("mylib::crop", mutates_args=())
defcrop(pic: torch.Tensor, box: Sequence[int]) -> torch.Tensor:
    img = to_pil_image(pic.cpu())
    cropped_img = img.crop(box)
    return (pil_to_tensor(cropped_img) / 255.).to(pic.device, pic.dtype)

# Use register_fake to add a ``FakeTensor`` kernel for the operator
@crop.register_fake
def_(pic, box):
    channels = pic.shape[0]
    x0, y0, x1, y1 = box
    result = pic.new_empty(y1 - y0, x1 - x0, channels).permute(2, 0, 1)
    # The result should have the same metadata (shape/strides/``dtype``/device)
    # as running the ``crop`` function above.
    return result
此后,crop 现在可以在不中断图的情况下正常工作:
@torch.compile(fullgraph=True)
deff(img):
    return crop(img, (10, 10, 50, 50))

cropped_img = f(img)
display(img)
display(cropped_img)

为作物添加训练支持
使用 torch.library.register_autograd 为操作符添加训练支持。优先使用此方法,而不是直接使用 torch.autograd.Function;某些情况下,将 autograd.Function 与 PyTorch 操作符注册 API 结合使用时,可能会在与 torch.compile 结合时导致(并且已经导致)无声的错误。
如果您不需要训练支持,则无需使用 torch.library.register_autograd。如果您最终使用了没有自动梯度注册的 custom_op 进行训练,我们会抛出一个错误信息。
crop 的梯度公式本质上是 PIL.paste(我们将推导过程留给读者作为练习)。首先,我们将 paste 包装成一个自定义操作符:
@torch.library.custom_op("mylib::paste", mutates_args=())
defpaste(im1: torch.Tensor, im2: torch.Tensor, coord: Sequence[int]) -> torch.Tensor:
    assert im1.device == im2.device
    assert im1.dtype == im2.dtype
    im1_pil = to_pil_image(im1.cpu())
    im2_pil = to_pil_image(im2.cpu())
    PIL.Image.Image.paste(im1_pil, im2_pil, coord)
    return (pil_to_tensor(im1_pil) / 255.).to(im1.device, im1.dtype)

@paste.register_fake
def_(im1, im2, coord):
    assert im1.device == im2.device
    assert im1.dtype == im2.dtype
    return torch.empty_like(im1)
现在让我们使用 register_autograd 来为 crop 指定梯度公式:
defbackward(ctx, grad_output):
    grad_input = grad_output.new_zeros(ctx.pic_shape)
    grad_input = paste(grad_input, grad_output, ctx.coords)
    return grad_input, None

defsetup_context(ctx, inputs, output):
    pic, box = inputs
    ctx.coords = box[:2]
    ctx.pic_shape = pic.shape

crop.register_autograd(backward, setup_context=setup_context)
请注意,backward 必须是由 PyTorch 理解的操作符组成的,这就是为什么我们将 paste 包装到一个自定义操作符中,而不是直接使用 PIL 的 paste。
img = img.requires_grad_()
result = crop(img, (10, 10, 50, 50))
result.sum().backward()
display(img.grad)
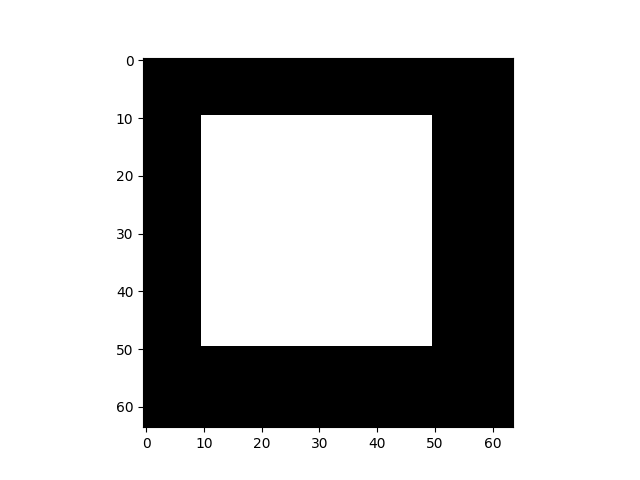
这是正确的梯度,裁剪区域为1(白色),未使用区域为0(黑色)。
测试 Python 自定义操作符
使用 torch.library.opcheck 来测试自定义算子是否正确注册。这并不会测试梯度在数学上是否正确;请为此编写单独的测试(手动测试或使用 torch.autograd.gradcheck)。
要使用 opcheck,请为其传递一组示例输入进行测试。如果您的算子支持训练,则示例中应包括需要梯度的张量。如果您的算子支持多个设备,则示例中应包括来自每个设备的张量。
examples = [
    [torch.randn(3, 64, 64), [0, 0, 10, 10]],
    [torch.randn(3, 91, 91, requires_grad=True), [10, 0, 20, 10]],
    [torch.randn(3, 60, 60, dtype=torch.double), [3, 4, 32, 20]],
    [torch.randn(3, 512, 512, requires_grad=True, dtype=torch.double), [3, 4, 32, 45]],
]

for example in examples:
    torch.library.opcheck(crop, example)
可变的 Python 自定义运算符
您还可以将修改其输入的 Python 函数封装为自定义操作符。修改输入的函数很常见,因为许多底层内核都是这样编写的;例如,计算 sin 的内核可能会接收一个输入张量和一个输出张量,并将 input.sin() 写入输出张量。
我们将使用 numpy.sin 来演示一个可变的 Python 自定义操作符的示例。
importnumpyasnp

@torch.library.custom_op("mylib::numpy_sin", mutates_args={"output"}, device_types="cpu")
defnumpy_sin(input: torch.Tensor, output: torch.Tensor) -> None:
    assert input.device == output.device
    assert input.device.type == "cpu"
    input_np = input.numpy()
    output_np = output.numpy()
    np.sin(input_np, out=output_np)
由于该运算符不返回任何内容,因此无需注册 FakeTensor 内核(元内核)即可使其与 torch.compile 一起工作。
@torch.compile(fullgraph=True)
deff(x):
    out = torch.empty(3)
    numpy_sin(x, out)
    return out

x = torch.randn(3)
y = f(x)
assert torch.allclose(y, x.sin())
这里是一个 opcheck 运行的示例,它告诉我们确实正确注册了操作符。例如,如果我们忘记将输出添加到 mutates_args 中,opcheck 就会报错。
example_inputs = [
    [torch.randn(3), torch.empty(3)],
    [torch.randn(0, 3), torch.empty(0, 3)],
    [torch.randn(1, 2, 3, 4, dtype=torch.double), torch.empty(1, 2, 3, 4, dtype=torch.double)],
]

for example in example_inputs:
    torch.library.opcheck(numpy_sin, example)
结论
在本教程中,我们学习了如何使用 torch.library.custom_op 在 Python 中创建一个自定义操作符,该操作符可以与 PyTorch 子系统(如 torch.compile 和自动求导)协同工作。
本教程提供了自定义操作符的基本介绍。如需更详细的信息,请参阅: