使用 NVDEC 加速视频解码
作者: Moto Hira
本教程展示了如何将 NVIDIA 的硬件视频解码器 (NVDEC) 与 TorchAudio 结合使用,以及它如何提升视频解码的性能。
本教程需要启用硬件加速编译的 FFmpeg 库。
有关如何构建启用硬件加速的 FFmpeg,请参考 启用 GPU 视频解码器/编码器。
import torch
import torchaudio

print(torch.__version__)
print(torchaudio.__version__)
2.6.0
2.6.0
import os
import time

import matplotlib.pyplot as plt
from torchaudio.io import StreamReader
检查前提条件
首先,我们检查 TorchAudio 是否正确检测到支持硬件解码器/编码器的 FFmpeg 库。
from torchaudio.utils import ffmpeg_utils
print("FFmpeg Library versions:")
for k, ver in ffmpeg_utils.get_versions().items():
    print(f"  {k}:\t{'.'.join(str(v)forvinver)}")
FFmpeg Library versions:
  libavcodec:   60.3.100
  libavdevice:  60.1.100
  libavfilter:  9.3.100
  libavformat:  60.3.100
  libavutil:    58.2.100
print("Available NVDEC Decoders:")
for k in ffmpeg_utils.get_video_decoders().keys():
    if "cuvid" in k:
        print(f" - {k}")
Available NVDEC Decoders:
 * av1_cuvid
 * h264_cuvid
 * hevc_cuvid
 * mjpeg_cuvid
 * mpeg1_cuvid
 * mpeg2_cuvid
 * mpeg4_cuvid
 * vc1_cuvid
 * vp8_cuvid
 * vp9_cuvid
print("Avaialbe GPU:")
print(torch.cuda.get_device_properties(0))
Avaialbe GPU:
_CudaDeviceProperties(name='NVIDIA A10G', major=8, minor=6, total_memory=22502MB, multi_processor_count=80, uuid=3a6a8555-efc9-d0dc-972b-36624af6fad8, L2_cache_size=6MB)
我们将使用以下视频,它具有以下属性:
-
编解码器: H.264
-
分辨率: 960x540
-
帧率: 29.97
-
像素格式: YUV420P
src = torchaudio.utils.download_asset(
    "tutorial-assets/stream-api/NASAs_Most_Scientifically_Complex_Space_Observatory_Requires_Precision-MP4_small.mp4"
)
  0%|          | 0.00/31.8M [00:00<?, ?B/s]
100%|##########| 31.8M/31.8M [00:00<00:00, 545MB/s]
使用 NVDEC 解码视频
要使用硬件视频解码器,您需要在定义输出视频流时通过向 add_video_stream() 方法传递 decoder 选项来指定硬件解码器。
s = StreamReader(src)
s.add_video_stream(5, decoder="h264_cuvid")
s.fill_buffer()
(video,) = s.pop_chunks()
视频帧被解码并以 NCHW 格式的张量返回。
print(video.shape, video.dtype)
torch.Size([5, 3, 540, 960]) torch.uint8
默认情况下,解码后的帧会被发送回 CPU 内存,并创建 CPU 张量。
print(video.device)
cpu
通过指定 hw_accel 选项,您可以将解码的帧转换为 CUDA 张量。hw_accel 选项接受字符串值并将其传递给 torch.device。
目前,
hw_accel选项和add_basic_video_stream()不兼容。add_basic_video_stream添加了后解码处理,该处理是为 CPU 内存中的帧设计的。请使用add_video_stream()。
s = StreamReader(src)
s.add_video_stream(5, decoder="h264_cuvid", hw_accel="cuda:0")
s.fill_buffer()
(video,) = s.pop_chunks()

print(video.shape, video.dtype, video.device)
torch.Size([5, 3, 540, 960]) torch.uint8 cuda:0
当有多个 GPU 可用时,
StreamReader默认使用第一个 GPU。您可以通过提供"gpu"选项来更改此设置。
# Video data is sent to CUDA device 0, decoded and
# converted on the same device.
s.add_video_stream(
    ...,
    decoder="h264_cuvid",
    decoder_option={"gpu": "0"},
    hw_accel="cuda:0",
)
"gpu"选项和hw_accel选项可以独立指定。如果它们不匹配,解码的帧会自动传输到hw_accel指定的设备。
# Video data is sent to CUDA device 0, and decoded there.
# Then it is transfered to CUDA device 1, and converted to
# CUDA tensor.
s.add_video_stream(
    ...,
    decoder="h264_cuvid",
    decoder_option={"gpu": "0"},
    hw_accel="cuda:1",
)
可视化
让我们看看硬件解码器解码的帧,并将其与软件解码器的等效结果进行比较。
以下函数会跳转到给定的时间戳,并使用指定的解码器解码一帧。
def test_decode(decoder: str, seek: float):
    s = StreamReader(src)
    s.seek(seek)
    s.add_video_stream(1, decoder=decoder)
    s.fill_buffer()
    (video,) = s.pop_chunks()
    return video[0]
timestamps = [12, 19, 45, 131, 180]

cpu_frames = [test_decode(decoder="h264", seek=ts) for ts in timestamps]
cuda_frames = [test_decode(decoder="h264_cuvid", seek=ts) for ts in timestamps]
目前,硬件解码器不支持色彩空间转换。解码后的帧为 YUV 格式。以下函数执行 YUV 到 RGB 的转换(以及用于绘图的轴重排)。
def yuv_to_rgb(frames):
    frames = frames.cpu().to(torch.float)
    y = frames[..., 0, :, :]
    u = frames[..., 1, :, :]
    v = frames[..., 2, :, :]

    y /= 255
    u = u / 255 - 0.5
    v = v / 255 - 0.5

    r = y + 1.14 * v
    g = y + -0.396 * u - 0.581 * v
    b = y + 2.029 * u

    rgb = torch.stack([r, g, b], -1)
    rgb = (rgb * 255).clamp(0, 255).to(torch.uint8)
    return rgb.numpy()
现在我们来可视化结果。
def plot():
    n_rows = len(timestamps)
    fig, axes = plt.subplots(n_rows, 2, figsize=[12.8, 16.0])
    for i in range(n_rows):
        axes[i][0].imshow(yuv_to_rgb(cpu_frames[i]))
        axes[i][1].imshow(yuv_to_rgb(cuda_frames[i]))

    axes[0][0].set_title("Software decoder")
    axes[0][1].set_title("HW decoder")
    plt.setp(axes, xticks=[], yticks=[])
    plt.tight_layout()


plot()
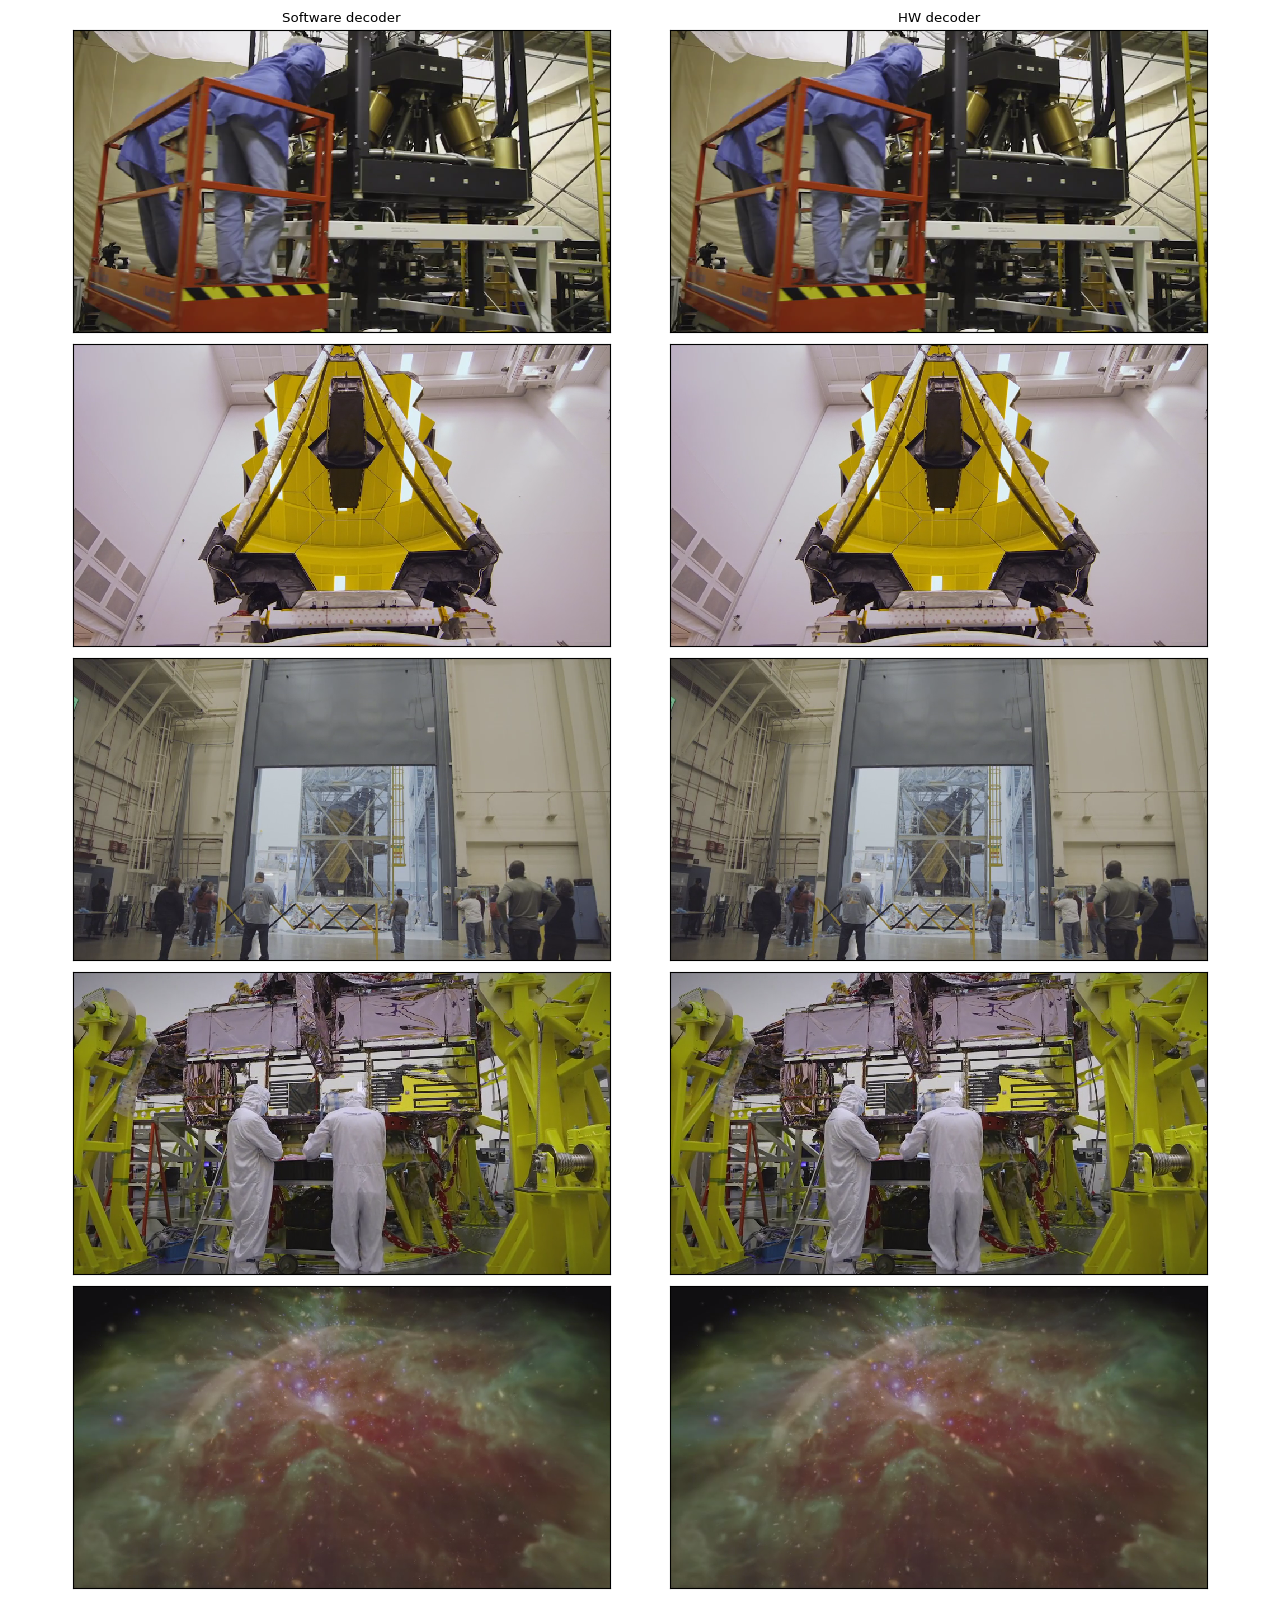
在作者看来,它们是无法区分的。如果您发现了什么,请随时告知我们。 :)
硬件调整和裁剪
您可以使用 decoder_option 参数来提供特定于解码器的选项。
以下选项在预处理中通常相关。
-
resize: 将帧大小调整为(width)x(height)。 -
crop: 裁剪帧(top)x(bottom)x(left)x(right)。注意,指定的值是要移除的行/列数。最终图像大小为(width - left - right)x(height - top - bottom)。如果同时使用crop和resize选项,crop会先执行。
有关其他可用选项,请运行 ffmpeg -h decoder=h264_cuvid。
def test_options(option):
    s = StreamReader(src)
    s.seek(87)
    s.add_video_stream(1, decoder="h264_cuvid", hw_accel="cuda:0", decoder_option=option)
    s.fill_buffer()
    (video,) = s.pop_chunks()
    print(f"Option: {option}:\t{video.shape}")
    return video[0]
original = test_options(option=None)
resized = test_options(option={"resize": "480x270"})
cropped = test_options(option={"crop": "135x135x240x240"})
cropped_and_resized = test_options(option={"crop": "135x135x240x240", "resize": "640x360"})
Option: None:   torch.Size([1, 3, 540, 960])
Option: {'resize': '480x270'}:  torch.Size([1, 3, 270, 480])
Option: {'crop': '135x135x240x240'}:    torch.Size([1, 3, 270, 480])
Option: {'crop': '135x135x240x240', 'resize': '640x360'}:       torch.Size([1, 3, 360, 640])
def plot():
    fig, axes = plt.subplots(2, 2, figsize=[12.8, 9.6])
    axes[0][0].imshow(yuv_to_rgb(original))
    axes[0][1].imshow(yuv_to_rgb(resized))
    axes[1][0].imshow(yuv_to_rgb(cropped))
    axes[1][1].imshow(yuv_to_rgb(cropped_and_resized))

    axes[0][0].set_title("Original")
    axes[0][1].set_title("Resized")
    axes[1][0].set_title("Cropped")
    axes[1][1].set_title("Cropped and resized")
    plt.tight_layout()
    return fig


plot()
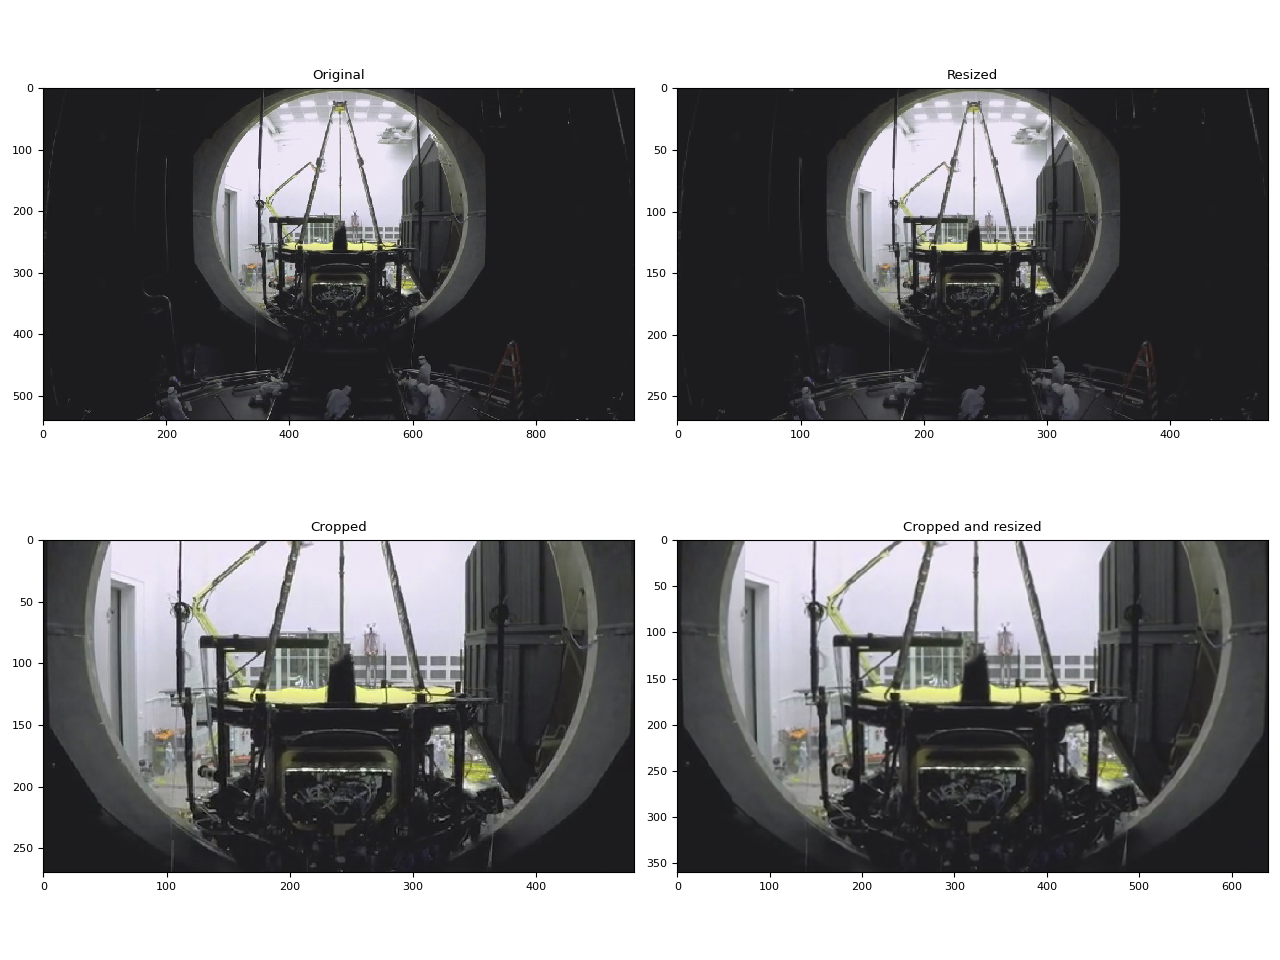
<Figure size 1280x960 with 4 Axes>
比较调整大小的方法
与软件缩放不同,NVDEC 不提供选择缩放算法的选项。在机器学习应用中,通常需要构建具有相似数值特性的预处理管道。因此,我们在这里比较了硬件缩放与不同算法的软件缩放的结果。
我们将使用以下视频,该视频包含使用以下命令生成的测试图案。
ffmpeg -y -f lavfi -t 12.05 -i mptestsrc -movflags +faststart mptestsrc.mp4
test_src = torchaudio.utils.download_asset("tutorial-assets/mptestsrc.mp4")
  0%|          | 0.00/232k [00:00<?, ?B/s]
100%|##########| 232k/232k [00:00<00:00, 41.6MB/s]
以下函数用于解码视频并应用指定的缩放算法。
def decode_resize_ffmpeg(mode, height, width, seek):
    filter_desc = None if mode is None else f"scale={width}:{height}:sws_flags={mode}"
    s = StreamReader(test_src)
    s.add_video_stream(1, filter_desc=filter_desc)
    s.seek(seek)
    s.fill_buffer()
    (chunk,) = s.pop_chunks()
    return chunk
以下函数使用硬件解码器来解码视频并调整大小。
def decode_resize_cuvid(height, width, seek):
    s = StreamReader(test_src)
    s.add_video_stream(1, decoder="h264_cuvid", decoder_option={"resize": f"{width}x{height}"}, hw_accel="cuda:0")
    s.seek(seek)
    s.fill_buffer()
    (chunk,) = s.pop_chunks()
    return chunk.cpu()
现在我们执行它们并可视化生成的帧。
params = {"height": 224, "width": 224, "seek": 3}

frames = [
    decode_resize_ffmpeg(None, **params),
    decode_resize_ffmpeg("neighbor", **params),
    decode_resize_ffmpeg("bilinear", **params),
    decode_resize_ffmpeg("bicubic", **params),
    decode_resize_cuvid(**params),
    decode_resize_ffmpeg("spline", **params),
    decode_resize_ffmpeg("lanczos:param0=1", **params),
    decode_resize_ffmpeg("lanczos:param0=3", **params),
    decode_resize_ffmpeg("lanczos:param0=5", **params),
]
def plot():
    fig, axes = plt.subplots(3, 3, figsize=[12.8, 15.2])
    for i, f in enumerate(frames):
        h, w = f.shape[2:4]
        f = f[..., : h // 4, : w // 4]
        axes[i // 3][i % 3].imshow(yuv_to_rgb(f[0]))
    axes[0][0].set_title("Original")
    axes[0][1].set_title("nearest neighbor")
    axes[0][2].set_title("bilinear")
    axes[1][0].set_title("bicubic")
    axes[1][1].set_title("NVDEC")
    axes[1][2].set_title("spline")
    axes[2][0].set_title("lanczos(1)")
    axes[2][1].set_title("lanczos(3)")
    axes[2][2].set_title("lanczos(5)")

    plt.setp(axes, xticks=[], yticks=[])
    plt.tight_layout()


plot()

没有一个完全相同。在作者看来,lanczos(1) 与 NVDEC 最为相似。bicubic 看起来也很接近。
使用 StreamReader 进行 NVDEC 基准测试
在本节中,我们将比较软件视频解码和硬件视频解码的性能。
解码为 CUDA 帧
首先,我们比较软件解码器和硬件编码器解码同一视频所需的时间。为了使结果具有可比性,在使用软件解码器时,我们将生成的张量移动到 CUDA。
测试过程如下所示
-
使用硬件解码器并直接将数据放置在 CUDA 上
-
使用软件解码器,生成 CPU 张量并将其移动到 CUDA。
以下函数实现了硬件解码器的测试用例。
def test_decode_cuda(src, decoder, hw_accel="cuda", frames_per_chunk=5):
    s = StreamReader(src)
    s.add_video_stream(frames_per_chunk, decoder=decoder, hw_accel=hw_accel)

    num_frames = 0
    chunk = None
    t0 = time.monotonic()
    for (chunk,) in s.stream():
        num_frames += chunk.shape[0]
    elapsed = time.monotonic() - t0
    print(f" - Shape: {chunk.shape}")
    fps = num_frames / elapsed
    print(f" - Processed {num_frames} frames in {elapsed:.2f} seconds. ({fps:.2f} fps)")
    return fps
以下函数实现了软件解码器的测试用例。
def test_decode_cpu(src, threads, decoder=None, frames_per_chunk=5):
    s = StreamReader(src)
    s.add_video_stream(frames_per_chunk, decoder=decoder, decoder_option={"threads": f"{threads}"})

    num_frames = 0
    device = torch.device("cuda")
    t0 = time.monotonic()
    for i, (chunk,) in enumerate(s.stream()):
        if i == 0:
            print(f" - Shape: {chunk.shape}")
        num_frames += chunk.shape[0]
        chunk = chunk.to(device)
    elapsed = time.monotonic() - t0
    fps = num_frames / elapsed
    print(f" - Processed {num_frames} frames in {elapsed:.2f} seconds. ({fps:.2f} fps)")
    return fps
对于每个视频分辨率,我们使用不同数量的线程运行多个软件解码器测试用例。
def run_decode_tests(src, frames_per_chunk=5):
    fps = []
    print(f"Testing: {os.path.basename(src)}")
    for threads in [1, 4, 8, 16]:
        print(f"* Software decoding (num_threads={threads})")
        fps.append(test_decode_cpu(src, threads))
    print("* Hardware decoding")
    fps.append(test_decode_cuda(src, decoder="h264_cuvid"))
    return fps
现在,我们使用不同分辨率的视频来运行测试。
QVGA
src_qvga = torchaudio.utils.download_asset("tutorial-assets/testsrc2_qvga.h264.mp4")
fps_qvga = run_decode_tests(src_qvga)
  0%|          | 0.00/1.06M [00:00<?, ?B/s]
100%|##########| 1.06M/1.06M [00:00<00:00, 147MB/s]
Testing: testsrc2_qvga.h264.mp4
* Software decoding (num_threads=1)
 * Shape: torch.Size([5, 3, 240, 320])
 * Processed 900 frames in 0.50 seconds. (1814.82 fps)
* Software decoding (num_threads=4)
 * Shape: torch.Size([5, 3, 240, 320])
 * Processed 900 frames in 0.34 seconds. (2679.88 fps)
* Software decoding (num_threads=8)
 * Shape: torch.Size([5, 3, 240, 320])
 * Processed 900 frames in 0.34 seconds. (2674.27 fps)
* Software decoding (num_threads=16)
 * Shape: torch.Size([5, 3, 240, 320])
 * Processed 895 frames in 0.43 seconds. (2088.70 fps)
* Hardware decoding
 * Shape: torch.Size([5, 3, 240, 320])
 * Processed 900 frames in 2.01 seconds. (447.36 fps)
VGA
src_vga = torchaudio.utils.download_asset("tutorial-assets/testsrc2_vga.h264.mp4")
fps_vga = run_decode_tests(src_vga)
  0%|          | 0.00/3.59M [00:00<?, ?B/s]
 59%|#####9    | 2.12M/3.59M [00:00<00:00, 10.0MB/s]
100%|##########| 3.59M/3.59M [00:00<00:00, 16.3MB/s]
Testing: testsrc2_vga.h264.mp4
* Software decoding (num_threads=1)
 * Shape: torch.Size([5, 3, 480, 640])
 * Processed 900 frames in 1.20 seconds. (749.76 fps)
* Software decoding (num_threads=4)
 * Shape: torch.Size([5, 3, 480, 640])
 * Processed 900 frames in 0.71 seconds. (1274.24 fps)
* Software decoding (num_threads=8)
 * Shape: torch.Size([5, 3, 480, 640])
 * Processed 900 frames in 0.70 seconds. (1285.18 fps)
* Software decoding (num_threads=16)
 * Shape: torch.Size([5, 3, 480, 640])
 * Processed 895 frames in 0.64 seconds. (1402.77 fps)
* Hardware decoding
 * Shape: torch.Size([5, 3, 480, 640])
 * Processed 900 frames in 0.34 seconds. (2639.80 fps)
XGA
src_xga = torchaudio.utils.download_asset("tutorial-assets/testsrc2_xga.h264.mp4")
fps_xga = run_decode_tests(src_xga)
  0%|          | 0.00/9.22M [00:00<?, ?B/s]
 98%|#########7| 9.00M/9.22M [00:00<00:00, 35.8MB/s]
100%|##########| 9.22M/9.22M [00:00<00:00, 36.4MB/s]
Testing: testsrc2_xga.h264.mp4
* Software decoding (num_threads=1)
 * Shape: torch.Size([5, 3, 768, 1024])
 * Processed 900 frames in 2.70 seconds. (333.73 fps)
* Software decoding (num_threads=4)
 * Shape: torch.Size([5, 3, 768, 1024])
 * Processed 900 frames in 1.38 seconds. (652.84 fps)
* Software decoding (num_threads=8)
 * Shape: torch.Size([5, 3, 768, 1024])
 * Processed 900 frames in 1.28 seconds. (703.55 fps)
* Software decoding (num_threads=16)
 * Shape: torch.Size([5, 3, 768, 1024])
 * Processed 895 frames in 1.30 seconds. (690.26 fps)
* Hardware decoding
 * Shape: torch.Size([5, 3, 768, 1024])
 * Processed 900 frames in 0.61 seconds. (1473.92 fps)
结果
现在我们绘制结果。
def plot():
    fig, ax = plt.subplots(figsize=[9.6, 6.4])

    for items in zip(fps_qvga, fps_vga, fps_xga, "ov^sx"):
        ax.plot(items[:-1], marker=items[-1])
    ax.grid(axis="both")
    ax.set_xticks([0, 1, 2], ["QVGA (320x240)", "VGA (640x480)", "XGA (1024x768)"])
    ax.legend(
        [
            "Software Decoding (threads=1)",
            "Software Decoding (threads=4)",
            "Software Decoding (threads=8)",
            "Software Decoding (threads=16)",
            "Hardware Decoding (CUDA Tensor)",
        ]
    )
    ax.set_title("Speed of processing video frames")
    ax.set_ylabel("Frames per second")
    plt.tight_layout()


plot()
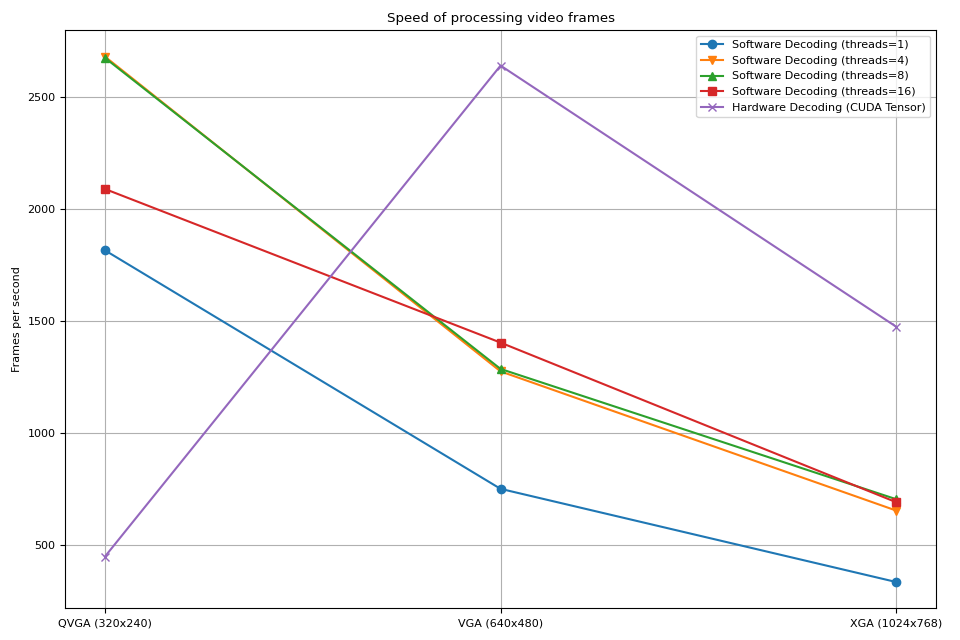
我们观察到以下几点
-
增加软件解码中的线程数量可以加快处理速度,但性能在约8个线程时趋于饱和。
-
使用硬件解码的性能提升取决于视频的分辨率。
-
在较低分辨率(如QVGA)下,硬件解码比软件解码更慢。
-
在较高分辨率(如XGA)下,硬件解码比软件解码更快。
值得注意的是,性能提升还取决于 GPU 的类型。我们观察到,在使用 V100 或 A100 GPU 解码 VGA 视频时,硬件解码器比软件解码器更慢。但使用 A10 GPU 时,硬件解码器比软件解码器更快。
解码与调整大小
接下来,我们将调整大小操作添加到管道中。我们将比较以下管道。
-
使用软件解码器解码视频,并将帧读取为 PyTorch Tensor。使用
torch.nn.functional.interpolate()调整张量大小,然后将结果张量发送到 CUDA 设备。 -
使用软件解码器解码视频,通过 FFmpeg 的滤镜图调整帧大小,将调整后的帧读取为 PyTorch 张量,然后将其发送到 CUDA 设备。
-
使用硬件解码器同时解码和调整视频大小,将结果帧读取为 CUDA 张量。
管道 1 代表了常见的视频加载实现。
管道 2 使用了 FFmpeg 的滤镜图,允许在将原始帧转换为 Tensors 之前对其进行处理。
管道 3 具有从 CPU 到 CUDA 的最小数据传输量,这显著提升了数据加载的性能。
以下函数实现了管道 1。它使用了 PyTorch 的 torch.nn.functional.interpolate()。我们使用了 bincubic 模式,因为我们发现生成的帧最接近 NVDEC 的缩放效果。
def test_decode_then_resize(src, height, width, mode="bicubic", frames_per_chunk=5):
    s = StreamReader(src)
    s.add_video_stream(frames_per_chunk, decoder_option={"threads": "8"})

    num_frames = 0
    device = torch.device("cuda")
    chunk = None
    t0 = time.monotonic()
    for (chunk,) in s.stream():
        num_frames += chunk.shape[0]
        chunk = torch.nn.functional.interpolate(chunk, [height, width], mode=mode, antialias=True)
        chunk = chunk.to(device)
    elapsed = time.monotonic() - t0
    fps = num_frames / elapsed
    print(f" - Shape: {chunk.shape}")
    print(f" - Processed {num_frames} frames in {elapsed:.2f} seconds. ({fps:.2f} fps)")
    return fps
以下函数实现了管道 2。帧在解码过程中被调整大小,然后发送到 CUDA 设备。
我们使用 bincubic 模式,以使结果与上述基于 PyTorch 的实现具有可比性。
def test_decode_and_resize(src, height, width, mode="bicubic", frames_per_chunk=5):
    s = StreamReader(src)
    s.add_video_stream(
        frames_per_chunk, filter_desc=f"scale={width}:{height}:sws_flags={mode}", decoder_option={"threads": "8"}
    )

    num_frames = 0
    device = torch.device("cuda")
    chunk = None
    t0 = time.monotonic()
    for (chunk,) in s.stream():
        num_frames += chunk.shape[0]
        chunk = chunk.to(device)
    elapsed = time.monotonic() - t0
    fps = num_frames / elapsed
    print(f" - Shape: {chunk.shape}")
    print(f" - Processed {num_frames} frames in {elapsed:.2f} seconds. ({fps:.2f} fps)")
    return fps
以下函数实现了管道3。调整大小操作由NVDEC执行,生成的张量被放置在CUDA内存中。
def test_hw_decode_and_resize(src, decoder, decoder_option, hw_accel="cuda", frames_per_chunk=5):
    s = StreamReader(src)
    s.add_video_stream(5, decoder=decoder, decoder_option=decoder_option, hw_accel=hw_accel)

    num_frames = 0
    chunk = None
    t0 = time.monotonic()
    for (chunk,) in s.stream():
        num_frames += chunk.shape[0]
    elapsed = time.monotonic() - t0
    fps = num_frames / elapsed
    print(f" - Shape: {chunk.shape}")
    print(f" - Processed {num_frames} frames in {elapsed:.2f} seconds. ({fps:.2f} fps)")
    return fps
以下函数在给定的源上运行基准测试函数。
def run_resize_tests(src):
    print(f"Testing: {os.path.basename(src)}")
    height, width = 224, 224
    print("* Software decoding with PyTorch interpolate")
    cpu_resize1 = test_decode_then_resize(src, height=height, width=width)
    print("* Software decoding with FFmpeg scale")
    cpu_resize2 = test_decode_and_resize(src, height=height, width=width)
    print("* Hardware decoding with resize")
    cuda_resize = test_hw_decode_and_resize(src, decoder="h264_cuvid", decoder_option={"resize": f"{width}x{height}"})
    return [cpu_resize1, cpu_resize2, cuda_resize]
现在我们运行测试。
QVGA
fps_qvga = run_resize_tests(src_qvga)
Testing: testsrc2_qvga.h264.mp4
* Software decoding with PyTorch interpolate
 * Shape: torch.Size([5, 3, 224, 224])
 * Processed 900 frames in 0.61 seconds. (1486.29 fps)
* Software decoding with FFmpeg scale
 * Shape: torch.Size([5, 3, 224, 224])
 * Processed 900 frames in 0.40 seconds. (2229.01 fps)
* Hardware decoding with resize
 * Shape: torch.Size([5, 3, 224, 224])
 * Processed 900 frames in 2.02 seconds. (444.56 fps)
VGA
fps_vga = run_resize_tests(src_vga)
Testing: testsrc2_vga.h264.mp4
* Software decoding with PyTorch interpolate
 * Shape: torch.Size([5, 3, 224, 224])
 * Processed 900 frames in 1.45 seconds. (620.26 fps)
* Software decoding with FFmpeg scale
 * Shape: torch.Size([5, 3, 224, 224])
 * Processed 900 frames in 0.69 seconds. (1300.24 fps)
* Hardware decoding with resize
 * Shape: torch.Size([5, 3, 224, 224])
 * Processed 900 frames in 0.34 seconds. (2653.73 fps)
XGA
fps_xga = run_resize_tests(src_xga)
Testing: testsrc2_xga.h264.mp4
* Software decoding with PyTorch interpolate
 * Shape: torch.Size([5, 3, 224, 224])
 * Processed 900 frames in 2.69 seconds. (334.90 fps)
* Software decoding with FFmpeg scale
 * Shape: torch.Size([5, 3, 224, 224])
 * Processed 900 frames in 1.06 seconds. (850.30 fps)
* Hardware decoding with resize
 * Shape: torch.Size([5, 3, 224, 224])
 * Processed 900 frames in 0.61 seconds. (1476.55 fps)
结果
现在我们绘制结果。
def plot():
    fig, ax = plt.subplots(figsize=[9.6, 6.4])

    for items in zip(fps_qvga, fps_vga, fps_xga, "ov^sx"):
        ax.plot(items[:-1], marker=items[-1])
    ax.grid(axis="both")
    ax.set_xticks([0, 1, 2], ["QVGA (320x240)", "VGA (640x480)", "XGA (1024x768)"])
    ax.legend(
        [
            "Software decoding\nwith resize\n(PyTorch interpolate)",
            "Software decoding\nwith resize\n(FFmpeg scale)",
            "NVDEC\nwith resizing",
        ]
    )
    ax.set_title("Speed of processing video frames")
    ax.set_xlabel("Input video resolution")
    ax.set_ylabel("Frames per second")
    plt.tight_layout()


plot()
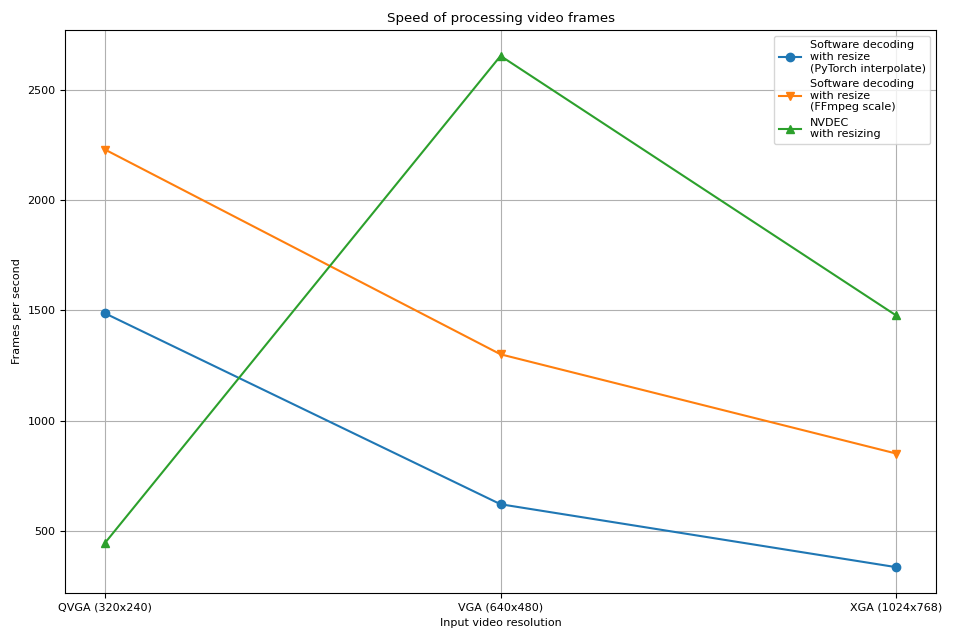
硬件解码器显示出与之前实验相似的趋势。实际上,性能几乎相同。硬件调整大小在缩小帧时几乎没有任何开销。
软件解码也显示出相似的趋势。在解码过程中进行大小调整速度更快。一个可能的解释是,视频帧在内部以 YUV420P 格式存储,其像素数量是 RGB24 或 YUV444P 的一半。这意味着如果在将帧数据复制到 PyTorch 张量之前进行大小调整,所操作和复制的像素数量比在帧转换为张量后进行调整的情况要少。
标签: torchaudio.io