StreamReader 高级用法
作者: Moto Hira
本教程是 StreamReader 基本用法 的延续。
本文将展示如何使用 StreamReader 来
-
设备输入,例如麦克风、摄像头和屏幕录制
-
生成合成音频/视频
-
使用自定义过滤器表达式进行预处理
import torch
import torchaudio

print(torch.__version__)
print(torchaudio.__version__)

import IPython
import matplotlib.pyplot as plt
from torchaudio.io import StreamReader

base_url = "https://download.pytorch.org/torchaudio/tutorial-assets"
AUDIO_URL = f"{base_url}/Lab41-SRI-VOiCES-src-sp0307-ch127535-sg0042.wav"
VIDEO_URL = f"{base_url}/stream-api/NASAs_Most_Scientifically_Complex_Space_Observatory_Requires_Precision-MP4.mp4"
2.6.0
2.6.0
音频/视频设备输入
假设系统配备了适当的媒体设备,并且 libavdevice 已配置为使用这些设备,流媒体 API 可以从这些设备中拉取媒体流。
为此,我们向构造函数传递额外的参数 format 和 option。format 指定设备组件,而 option 字典则针对指定的组件进行配置。
需要传递的具体参数取决于系统配置。详情请参考 https://ffmpeg.org/ffmpeg-devices.html。
以下示例展示了如何在 MacBook Pro 上实现这一操作。
首先,我们需要检查可用的设备。
$ ffmpeg -f avfoundation -list_devices true -i ""
[AVFoundation indev @ 0x143f04e50] AVFoundation video devices:
[AVFoundation indev @ 0x143f04e50] [0] FaceTime HD Camera
[AVFoundation indev @ 0x143f04e50] [1] Capture screen 0
[AVFoundation indev @ 0x143f04e50] AVFoundation audio devices:
[AVFoundation indev @ 0x143f04e50] [0] MacBook Pro Microphone
我们使用 FaceTime HD 摄像头作为视频设备(索引 0)和 MacBook Pro 麦克风作为音频设备(索引 0)。
如果我们不传递任何 option,设备将使用其默认配置。解码器可能不支持该配置。
>>> StreamReader(
...     src="0:0",  # The first 0 means `FaceTime HD Camera`, and
...                 # the second 0 indicates `MacBook Pro Microphone`.
...     format="avfoundation",
... )
[avfoundation @ 0x125d4fe00] Selected framerate (29.970030) is not supported by the device.
[avfoundation @ 0x125d4fe00] Supported modes:
[avfoundation @ 0x125d4fe00]   1280x720@[1.000000 30.000000]fps
[avfoundation @ 0x125d4fe00]   640x480@[1.000000 30.000000]fps
Traceback (most recent call last):
  File "<stdin>", line 1, in <module>
...
RuntimeError: Failed to open the input: 0:0
通过提供 option,我们可以将设备流的格式更改为解码器支持的格式。
>>> streamer = StreamReader(
...     src="0:0",
...     format="avfoundation",
...     option={"framerate": "30", "pixel_format": "bgr0"},
... )
>>> for i in range(streamer.num_src_streams):
...     print(streamer.get_src_stream_info(i))
SourceVideoStream(media_type='video', codec='rawvideo', codec_long_name='raw video', format='bgr0', bit_rate=0, width=640, height=480, frame_rate=30.0)
SourceAudioStream(media_type='audio', codec='pcm_f32le', codec_long_name='PCM 32-bit floating point little-endian', format='flt', bit_rate=3072000, sample_rate=48000.0, num_channels=2)
合成源流
作为设备集成的一部分,ffmpeg 提供了一个“虚拟设备”接口。该接口利用 libavfilter 生成合成的音频/视频数据。
要使用此功能,我们设置 format=lavfi 并向 src 提供过滤器描述。
有关过滤器描述的详细信息,请参阅 https://ffmpeg.org/ffmpeg-filters.html。
音频示例
正弦波
https://ffmpeg.org/ffmpeg-filters.html#sine
StreamReader(src="sine=sample_rate=8000:frequency=360", format="lavfi")

使用任意表达式的信号
https://ffmpeg.org/ffmpeg-filters.html#aevalsrc
# 5 Hz binaural beats on a 360 Hz carrier
StreamReader(
    src=(
        'aevalsrc='
        'sample_rate=8000:'
        'exprs=0.1*sin(2*PI*(360-5/2)*t)|0.1*sin(2*PI*(360+5/2)*t)'
    ),
    format='lavfi',
 )

噪声
https://ffmpeg.org/ffmpeg-filters.html#anoisesrc
StreamReader(src="anoisesrc=color=pink:sample_rate=8000:amplitude=0.5", format="lavfi")

视频示例
细胞自动机
https://ffmpeg.org/ffmpeg-filters.html#cellauto
StreamReader(src=f"cellauto", format="lavfi")
曼德勃罗集
https://ffmpeg.org/ffmpeg-filters.html#cellauto
StreamReader(src=f"mandelbrot", format="lavfi")
MPlayer 测试图案
https://ffmpeg.org/ffmpeg-filters.html#mptestsrc
StreamReader(src=f"mptestsrc", format="lavfi")
约翰·康威的生命游戏
https://ffmpeg.org/ffmpeg-filters.html#life
StreamReader(src=f"life", format="lavfi")
谢尔宾斯基地毯/三角形分形
https://ffmpeg.org/ffmpeg-filters.html#sierpinski
StreamReader(src=f"sierpinski", format="lavfi")
自定义过滤器
在定义输出流时,您可以使用 add_audio_stream() 和 add_video_stream() 方法。
这些方法接受 filter_desc 参数,该参数是一个根据 ffmpeg 的过滤器表达式格式化的字符串。
add_basic_(audio|video)_stream 和 add_(audio|video)_stream 之间的区别在于,add_basic_(audio|video)_stream 会构建过滤器表达式并将其传递给相同的底层实现。add_basic_(audio|video)_stream 所能实现的一切功能,都可以通过 add_(audio|video)_stream 来实现。
在应用自定义过滤器时,客户端代码必须将音频/视频流转换为 torchaudio 可以转换为张量格式的格式之一。例如,可以通过对视频流应用
format=pix_fmts=rgb24和对音频流应用aformat=sample_fmts=fltp来实现这一点。每个输出流都有独立的过滤器图。因此,无法为过滤器表达式使用不同的输入/输出流。然而,可以将一个输入流拆分为多个流,并在之后将它们合并。
音频示例
# fmt: off
descs = [
    # No filtering
    "anull",
    # Apply a highpass filter then a lowpass filter
    "highpass=f=200,lowpass=f=1000",
    # Manipulate spectrogram
    (
        "afftfilt="
        "real='hypot(re,im)*sin(0)':"
        "imag='hypot(re,im)*cos(0)':"
        "win_size=512:"
        "overlap=0.75"
    ),
    # Manipulate spectrogram
    (
        "afftfilt="
        "real='hypot(re,im)*cos((random(0)*2-1)*2*3.14)':"
        "imag='hypot(re,im)*sin((random(1)*2-1)*2*3.14)':"
        "win_size=128:"
        "overlap=0.8"
    ),
]
# fmt: on
sample_rate = 8000

streamer = StreamReader(AUDIO_URL)
for desc in descs:
    streamer.add_audio_stream(
        frames_per_chunk=40000,
        filter_desc=f"aresample={sample_rate},{desc},aformat=sample_fmts=fltp",
    )

chunks = next(streamer.stream())


def _display(i):
    print("filter_desc:", streamer.get_out_stream_info(i).filter_description)
    fig, axs = plt.subplots(2, 1)
    waveform = chunks[i][:, 0]
    axs[0].plot(waveform)
    axs[0].grid(True)
    axs[0].set_ylim([-1, 1])
    plt.setp(axs[0].get_xticklabels(), visible=False)
    axs[1].specgram(waveform, Fs=sample_rate)
    fig.tight_layout()
    return IPython.display.Audio(chunks[i].T, rate=sample_rate)
原始
_display(0)
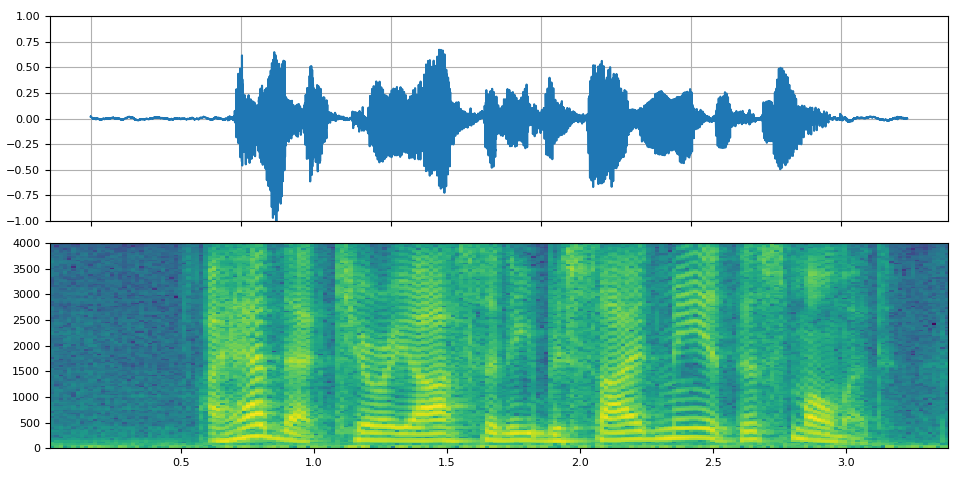
filter_desc: aresample=8000,anull,aformat=sample_fmts=fltp
高通/低通滤波器
_display(1)
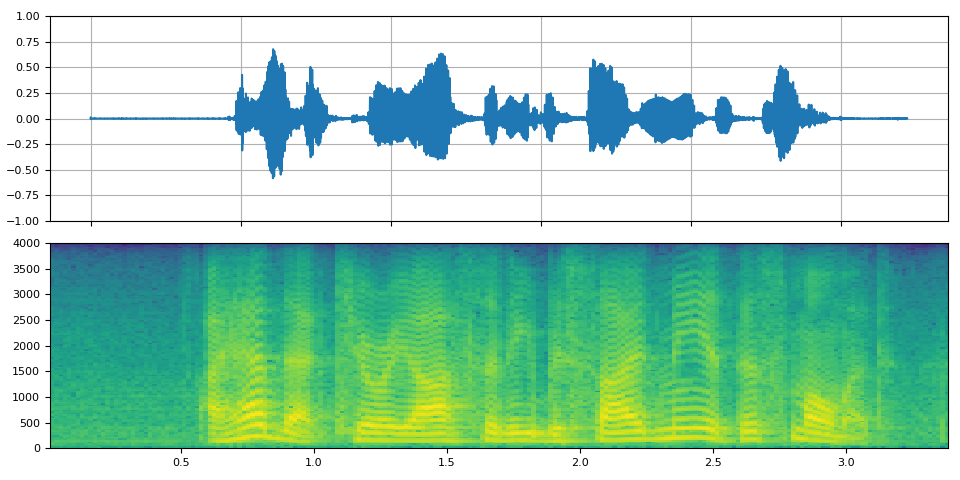
filter_desc: aresample=8000,highpass=f=200,lowpass=f=1000,aformat=sample_fmts=fltp
FFT 滤波器 - 机器人 🤖
_display(2)
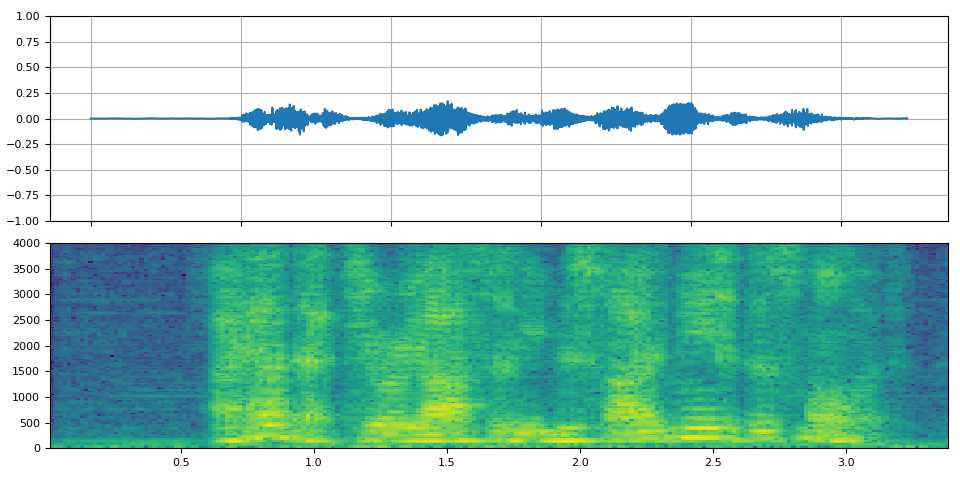
filter_desc: aresample=8000,afftfilt=real='hypot(re,im)*sin(0)':imag='hypot(re,im)*cos(0)':win_size=512:overlap=0.75,aformat=sample_fmts=fltp
FFT 滤波器 - 耳语效果
_display(3)
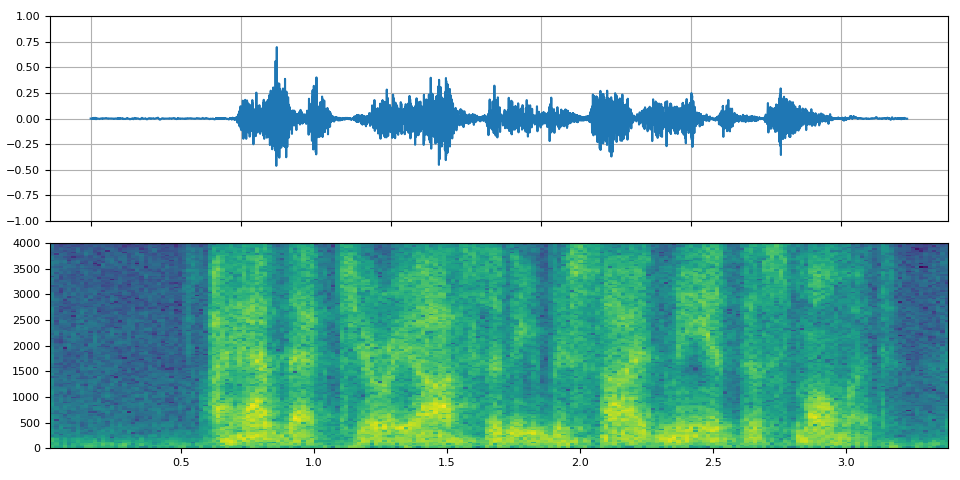
filter_desc: aresample=8000,afftfilt=real='hypot(re,im)*cos((random(0)*2-1)*2*3.14)':imag='hypot(re,im)*sin((random(1)*2-1)*2*3.14)':win_size=128:overlap=0.8,aformat=sample_fmts=fltp
视频示例
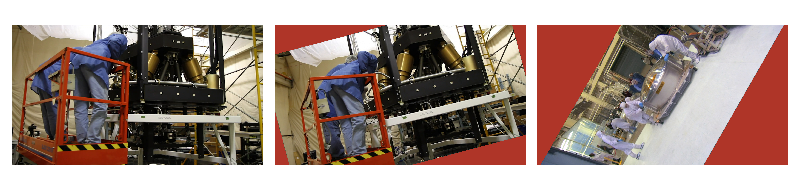
# fmt: off
descs = [
    # No effect
    "null",
    # Split the input stream and apply horizontal flip to the right half.
    (
        "split [main][tmp];"
        "[tmp] crop=iw/2:ih:0:0, hflip [flip];"
        "[main][flip] overlay=W/2:0"
    ),
    # Edge detection
    "edgedetect=mode=canny",
    # Rotate image by randomly and fill the background with brown
    "rotate=angle=-random(1)*PI:fillcolor=brown",
    # Manipulate pixel values based on the coordinate
    "geq=r='X/W*r(X,Y)':g='(1-X/W)*g(X,Y)':b='(H-Y)/H*b(X,Y)'"
]
# fmt: on
streamer = StreamReader(VIDEO_URL)
for desc in descs:
    streamer.add_video_stream(
        frames_per_chunk=30,
        filter_desc=f"fps=10,{desc},format=pix_fmts=rgb24",
    )

streamer.seek(12)

chunks = next(streamer.stream())


def _display(i):
    print("filter_desc:", streamer.get_out_stream_info(i).filter_description)
    _, axs = plt.subplots(1, 3, figsize=(8, 1.9))
    chunk = chunks[i]
    for j in range(3):
        axs[j].imshow(chunk[10 * j + 1].permute(1, 2, 0))
        axs[j].set_axis_off()
    plt.tight_layout()
原始代码
_display(0)
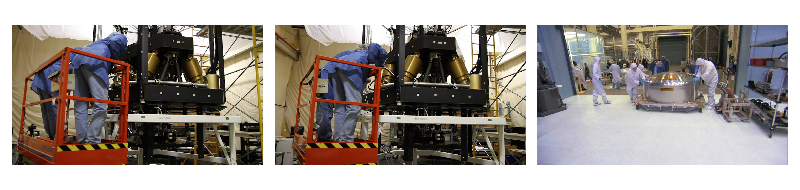
filter_desc: fps=10,null,format=pix_fmts=rgb24
镜像
_display(1)
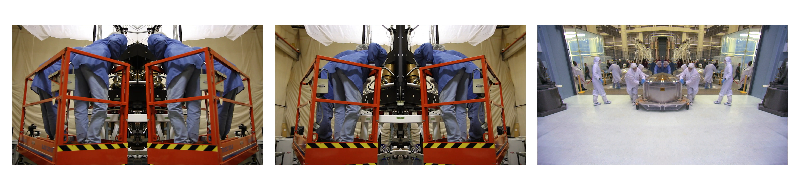
filter_desc: fps=10,split [main][tmp];[tmp] crop=iw/2:ih:0:0, hflip [flip];[main][flip] overlay=W/2:0,format=pix_fmts=rgb24
边缘检测
_display(2)

filter_desc: fps=10,edgedetect=mode=canny,format=pix_fmts=rgb24
随机旋转
_display(3)
filter_desc: fps=10,rotate=angle=-random(1)*PI:fillcolor=brown,format=pix_fmts=rgb24
像素操作
_display(4)
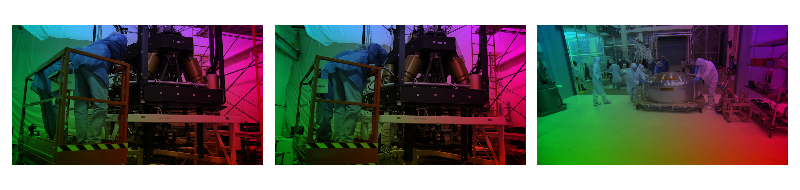
filter_desc: fps=10,geq=r='X/W*r(X,Y)':g='(1-X/W)*g(X,Y)':b='(H-Y)/H*b(X,Y)',format=pix_fmts=rgb24
标签: torchaudio.io