本教程展示了一系列应用程序,这些应用结合了Spring Data REST的强大后端功能和React的高级特性,用于构建易于理解的用户界面。
-
Spring Data REST 提供了一种快速创建超媒体驱动仓库的方式。
-
React 是 Facebook 提供的高效、快速且易用的 JavaScript 视图解决方案。
第1部分 — 基本特性
欢迎,Spring社区。
本节展示了如何快速搭建一个基础的 Spring Data REST 应用程序,并演示了如何使用 Facebook 的 React.js 工具集来为其添加一个简单的用户界面。
步骤 0 — 配置您的开发环境
您可以从这个仓库获取代码并跟着实践。
如果你想自己动手,請訪問 https://start.spring.io 並選擇以下依賴項:
-
Rest 仓库
-
Thymeleaf
-
JPA
-
H2
此示例使用 Java 8、Maven 项目以及 Spring Boot 的最新稳定版本。它还使用用 ES6 编写的 React.js。这将为你提供一个干净的空项目。你可以从那里添加本节中明确显示的各种文件,或参考前面列出的存储库。
最初……
最初,只有数据,而这些数据非常有价值。然而,随着时间的推移,人们希望以多种方式来访问这些数据。多年来,大家拼凑了许多MVC控制器,其中许多都利用了Spring强大的REST支持功能。但是,重复做同样的事情耗费了大量的时间。
Spring Data REST展示了,在作出某些假设的情况下,这个问题可以变得多么简单:
-
开发人员使用一个支持仓库模型的 Spring Data 项目。
-
系统采用广泛认可的行业标准协议,例如 HTTP 动词、标准化媒体类型以及 IANA 批准的链接名称。
声明您的域
领域对象是任何基于 Spring Data REST 的应用程序的基础。在本节中,你将构建一个用于追踪公司员工的应用程序,并从创建以下数据类型开始:
@Entity (1)
public class Employee {

	private @Id @GeneratedValue Long id; (2)
	private String firstName;
	private String lastName;
	private String description;

	private Employee() {}

	public Employee(String firstName, String lastName, String description) {
		this.firstName = firstName;
		this.lastName = lastName;
		this.description = description;
	}

	@Override
	public boolean equals(Object o) {
		if (this == o) return true;
		if (o == null || getClass() != o.getClass()) return false;
		Employee employee = (Employee) o;
		return Objects.equals(id, employee.id) &&
			Objects.equals(firstName, employee.firstName) &&
			Objects.equals(lastName, employee.lastName) &&
			Objects.equals(description, employee.description);
	}

	@Override
	public int hashCode() {

		return Objects.hash(id, firstName, lastName, description);
	}

	public Long getId() {
		return id;
	}

	public void setId(Long id) {
		this.id = id;
	}

	public String getFirstName() {
		return firstName;
	}

	public void setFirstName(String firstName) {
		this.firstName = firstName;
	}

	public String getLastName() {
		return lastName;
	}

	public void setLastName(String lastName) {
		this.lastName = lastName;
	}

	public String getDescription() {
		return description;
	}

	public void setDescription(String description) {
		this.description = description;
	}

	@Override
	public String toString() {
		return "Employee{" +
			"id=" + id +
			", firstName='" + firstName + '\'' +
			", lastName='" + lastName + '\'' +
			", description='" + description + '\'' +
			'}';
	}
}| 1 | @Entity 是一个 JPA 注解,用于表示整个类将存储在关系表中。 |
| 2 | @Id 和 @GeneratedValue 是 JPA 注解,用于标记主键并在需要时自动生成。 |
此实体用于跟踪员工信息,例如他们的姓名和工作描述。
| Spring Data REST 不仅限于 JPA。它支持多种 NoSQL 数据存储,尽管本教程中不会展示这些内容。更多相关信息,请参阅 使用 REST 访问 Neo4j 数据、使用 REST 访问 JPA 数据 和 使用 REST 访问 MongoDB 数据。 |
定义仓库
Spring Data REST 应用的另一个关键组成部分是相应的仓库定义,如下所示:
public interface EmployeeRepository extends CrudRepository<Employee, Long> { (1)

}| 1 | 该仓库继承了 Spring Data Commons 的 CrudRepository,并指定领域对象及其主键的类型。 |
这就够了!实际上,如果接口是顶级且可见的,甚至无需添加注解。如果你使用 IDE 并打开 CrudRepository,你会发现一组预定义的方法。
| 你可以定义自己的仓库。Spring Data REST 同样支持这一功能。 |
预加载演示
要使用此应用程序,你需要先加载一些数据,具体方法如下:
@Component (1)
public class DatabaseLoader implements CommandLineRunner { (2)

	private final EmployeeRepository repository;

	@Autowired (3)
	public DatabaseLoader(EmployeeRepository repository) {
		this.repository = repository;
	}

	@Override
	public void run(String... strings) throws Exception { (4)
		this.repository.save(new Employee("Frodo", "Baggins", "ring bearer"));
	}
}| 1 | 此类使用了 Spring 的 @Component 注解,因此会自动被 @SpringBootApplication 识别。 |
| 2 | 它实现了 Spring Boot 的 CommandLineRunner,因此在所有 Bean 创建并注册之后运行。 |
| 3 | 它通过构造函数注入和自动装配来获取 Spring Data 自动生成的 EmployeeRepository。 |
| 4 | run() 方法通过命令行参数被调用,并加载你的数据。 |
Spring Data 最强大的功能之一是它能够自动生成 JPA 查询。这不仅节省了开发时间,还减少了 bug 和错误的风险。Spring Data 通过分析仓库类中的方法名称 来确定你需要的操作,包括保存、删除和查找。
这就是我们可以通过编写一个空接口来继承已有的保存、查找和删除操作的方法。
调整根 URI
默认情况下,Spring Data REST 在 / 路径上主机一个链接的根集合。由于你将在该路径上托管一个 web 界面,因此需要更改根 URI,如下所示:
spring.data.rest.base-path=/api
启动后端
要启动一个完全功能的 REST API,最后一步是使用 Spring Boot 编写一个 public static void main 方法,如下所示:
@SpringBootApplication
public class ReactAndSpringDataRestApplication {

	public static void main(String[] args) {
		SpringApplication.run(ReactAndSpringDataRestApplication.class, args);
	}
}
假设前面的类以及你的 Maven 构建文件是从 https://start.spring.io 生成的,你现在可以通过在 IDE 中运行该 main() 方法或在命令行中输入 ./mvnw spring-boot:run 来启动应用程序。(对于 Windows 用户是 mvnw.bat)。
| 如果你不熟悉 Spring Boot 及其工作原理,建议观看 Josh Long 的入门演示之一。看过了吗?继续吧! |
探索你的REST服务
当应用运行时,你可以在命令行中使用 cURL(或任何其他你喜欢的工具)进行检查。以下命令及其输出展示了如何列出应用程序中的链接:
$ curl localhost:8080/api
{
  "_links" : {
    "employees" : {
      "href" : "http://localhost:8080/api/employees"
    },
    "profile" : {
      "href" : "http://localhost:8080/api/profile"
    }
  }
}
当你向根节点发送 ping 请求时,会收到一个包含在 HAL 格式 JSON 文档 中的链接集合。
-
_links是一个包含可用链接的集合。 -
employees指向由EmployeeRepository接口定义的员工对象的聚合根。 -
profile是一个 IANA 标准关系,指向整个服务的可发现元数据。我们将在后续章节中进一步探讨这一内容。
你可以通过导航到 employees 链接来进一步探索该服务。以下命令及其输出展示了具体操作方法:
$ curl localhost:8080/api/employees
{
  "_embedded" : {
    "employees" : [ {
      "firstName" : "Frodo",
      "lastName" : "Baggins",
      "description" : "ring bearer",
      "_links" : {
        "self" : {
          "href" : "http://localhost:8080/api/employees/1"
        }
      }
    } ]
  }
}
在这个阶段,你正在查看整个员工列表。
除了你之前预加载的数据之外,还会包含一个带有 self 链接的 _links 属性。这是该特定员工的规范链接。“规范”意味着“不依赖于上下文”。例如,同一个用户可以通过 /api/orders/1/processor 获取,在这种情况下,员工与处理某个特定订单相关联。在这里,并没有与其他实体的关系。
| 链接是REST的关键方面,它们提供了导航到相关项的能力。这使得其他方可以在API发生变化时无需每次都重新编写代码就能在你的API中进行导航。当客户端硬编码资源路径时,会导致更新问题。重构资源可能会导致代码出现重大变动。如果使用了链接并保持了导航路线,则进行此类调整会变得容易且灵活。 |
如果你想查看某个特定员工的信息,可以使用以下命令(及其输出示例):
$ curl localhost:8080/api/employees/1
{
  "firstName" : "Frodo",
  "lastName" : "Baggins",
  "description" : "ring bearer",
  "_links" : {
    "self" : {
      "href" : "http://localhost:8080/api/employees/1"
    }
  }
}
这里几乎没有变化,因为只有领域对象,所以不需要_embedded包装器。
这当然不错,但你可能迫不及待地想要创建一些新的条目了。以下命令及其输出展示了具体操作方法:
$ curl -X POST localhost:8080/api/employees -d "{\"firstName\": \"Bilbo\", \"lastName\": \"Baggins\", \"description\": \"burglar\"}" -H "Content-Type:application/json"
{
  "firstName" : "Bilbo",
  "lastName" : "Baggins",
  "description" : "burglar",
  "_links" : {
    "self" : {
      "href" : "http://localhost:8080/api/employees/2"
    }
  }
}
你也可以使用 PUT、PATCH 和 DELETE 操作,如此相关指南所示。不过,我们现在将转向构建一个漂亮的用户界面。
设置自定义UI控制器
使用 Spring Boot 可以轻松创建自定义网页。首先,你需要一个 Spring MVC 控制器,如下所示:
@Controller (1)
public class HomeController {

	@RequestMapping(value = "/") (2)
	public String index() {
		return "index"; (3)
	}

}| 1 | @Controller 将此类标记为 Spring MVC 控制器。 |
| 2 | @RequestMapping 标记了 index() 方法,使其支持 / 路由。 |
| 3 | 它返回index作为模板名称,Spring Boot 自动配置的视图解析器会将其映射到src/main/resources/templates/index.html。 |
定义HTML模板
你正在使用 Thymeleaf,尽管实际上并不会用到其很多功能。开始时需要创建一个索引页面,如下所示:
<!DOCTYPE html>
<html xmlns:th="https://www.thymeleaf.org">
<head lang="en">
    <meta charset="UTF-8"/>
    <title>ReactJS + Spring Data REST</title>
    <link rel="stylesheet" href="/main.css" />
</head>
<body>

    <div id="react"></div>

    <script src="built/bundle.js"></script>

</body>
</html>
此模板的关键部分是中间的 <div id="react"></div> 组件。这是你将指示 React 插入渲染输出的位置。
你也可能会想知道那个 bundle.js 文件是从哪里来的。它的构建过程将在下一节中展示。
本教程未展示 main.css,但你可以在上方看到它已被链接起来。关于 CSS,Spring Boot 会自动提供位于 src/main/resources/static 目录下的任何文件。你可以将自己项目的 main.css 文件放在这里。由于本教程的重点是 React 和 Spring Data REST,因此未展示 CSS 部分。 |
加载JavaScript模块
本节提供了一些基本的信息,帮助你的 JavaScript 部分顺利运行。虽然你可以安装所有的 JavaScript 命令行工具,但这并不是必需的——至少目前不需要这样做。相反,你只需要在 pom.xml 构建文件中添加以下内容:
frontend-maven-plugin 构建 JavaScript 部分
<plugin>
	<groupId>com.github.eirslett</groupId>
	<artifactId>frontend-maven-plugin</artifactId>
</plugin>
这个小插件会执行多个步骤:
-
install-node-and-npm命令将把 node.js 及其包管理工具npm安装到target文件夹中。(这确保二进制文件不会被纳入源代码控制,并且可以使用clean进行清理。) -
运行
npm命令并提供参数(如install),将会执行相应的 npm 操作。这样会安装package.json文件中定义的模块。 -
运行
webpack命令将会执行 webpack 可执行文件,并根据webpack.config.js文件编译所有 JavaScript 代码。
这些步骤依次运行,包括安装 node.js、下载 JavaScript 模块以及构建 JS 代码。
安装了哪些模块?JavaScript 开发者通常使用 npm 来创建一个 package.json 文件,例如:
{
  "name": "spring-data-rest-and-reactjs",
  "version": "0.1.0",
  "description": "Demo of ReactJS + Spring Data REST",
  "repository": {
    "type": "git",
    "url": "git@github.com:spring-guides/tut-react-and-spring-data-rest.git"
  },
  "keywords": [
    "rest",
    "hateoas",
    "spring",
    "data",
    "react"
  ],
  "author": "Greg L. Turnquist",
  "license": "Apache-2.0",
  "bugs": {
    "url": "https://github.com/spring-guides/tut-react-and-spring-data-rest/issues"
  },
  "homepage": "https://github.com/spring-guides/tut-react-and-spring-data-rest",
  "dependencies": {
    "react": "^16.5.2",
    "react-dom": "^16.5.2",
    "rest": "^1.3.1"
  },
  "scripts": {
    "watch": "webpack --watch -d --output ./target/classes/static/built/bundle.js"
  },
  "devDependencies": {
    "@babel/core": "^7.1.0",
    "@babel/preset-env": "^7.1.0",
    "@babel/preset-react": "^7.0.0",
    "babel-loader": "^8.0.2",
    "webpack": "^4.19.1",
    "webpack-cli": "^3.1.0"
  }
}
关键依赖项包括:
-
React.js:本教程使用的工具包
-
rest.js: 使用 CujoJS 工具包来进行 REST 调用
-
webpack:一个用于将 JavaScript 组件编译成单一可加载包的工具包
-
babel: 用于编写 ES6 格式的 JavaScript 代码,并将其编译为可在浏览器中运行的 ES5 代码
为了构建你后续将使用的 JavaScript 代码,需要为 webpack 定义一个构建文件,具体如下:
var path = require('path');

module.exports = {
    entry: './src/main/js/app.js',
    devtool: 'sourcemaps',
    cache: true,
    mode: 'development',
    output: {
        path: __dirname,
        filename: './src/main/resources/static/built/bundle.js'
    },
    module: {
        rules: [
            {
                test: path.join(__dirname, '.'),
                exclude: /(node_modules)/,
                use: [{
                    loader: 'babel-loader',
                    options: {
                        presets: ["@babel/preset-env", "@babel/preset-react"]
                    }
                }]
            }
        ]
    }
};
这个 Webpack 配置文件:
-
将入口点定义为
./src/main/js/app.js。本质上,app.js(你即将编写的模块)是我们的 JavaScript 应用程序中的public static void main()方法。webpack需要知道这一点,以便在浏览器加载最终包时确定要启动的内容。 -
生成源映射,使你在使用浏览器调试 JS 代码时能够链接到原始源代码。
-
将所有 JavaScript 代码编译到
./src/main/resources/static/built/bundle.js,这是一个类似于 Spring Boot 大型 JAR 文件的 JavaScript 文件。你所有的自定义代码以及通过require()调用引入的模块都被打包到了这个文件中。 -
它集成了 babel 引擎,并使用了
es2015和react预设,以将 ES6 React 代码编译为可在任何标准浏览器中运行的格式。
有关这些JavaScript工具的操作详情,请参阅相应的参考文档。
希望看到你的 JavaScript 修改自动更新吗?运行 npm run-script watch 将 webpack 设置为监听模式。这样,在你编辑源代码时,bundle.js 会自动重新生成。 |
完成上述设置后,你可以在 DOM 加载完毕后专注于 React 部分。这部分内容如下所示,并进行了细分:
既然你使用 Webpack 来组装资源,继续获取所需的模块。
const React = require('react'); (1)
const ReactDOM = require('react-dom'); (2)
const client = require('./client'); (3)| 1 | React 是 Facebook 提供的一个主要库,用于构建此应用程序。 |
| 2 | ReactDOM 是 React 的 DOM 和服务器渲染器的入口点包。它旨在与通用的 React 包一起使用。 |
| 3 | client 是自定义代码,用于配置 rest.js 以支持 HAL、URI 模板等功能,并将默认的 Accept 请求头设置为 application/hal+json。你可以在这里阅读代码。 |
未展示 client 代码的原因是你使用的具体 REST 调用工具并不重要。你可以自行查看源码,但关键在于,你可以选择使用 Restangular 或你偏好的其他工具,相关概念依然适用。 |
深入React
React 是基于组件来构建的。通常,一个组件可以包含另一个组件的多个实例,形成层级关系中的父组件和子组件。这种层级关系可以延伸到多层。
为了开始,有一个包含所有组件的顶级容器是非常有用的。(在本系列中随着代码的扩展,这一点会变得更为明显。)目前你只有员工列表。但是将来可能会用到其他的相关组件,因此先从以下内容开始:
class App extends React.Component { (1)

	constructor(props) {
		super(props);
		this.state = {employees: []};
	}

	componentDidMount() { (2)
		client({method: 'GET', path: '/api/employees'}).done(response => {
			this.setState({employees: response.entity._embedded.employees});
		});
	}

	render() { (3)
		return (
			<EmployeeList employees={this.state.employees}/>
		)
	}
}| 1 | class App extends React.Component{…} 用于创建一个 React 组件。 |
| 2 | 当React在DOM中渲染一个组件后,会调用componentDidMount API。 |
| 3 | render 是将组件“渲染”到屏幕上的 API。 |
| 在 React 中,用大写命名组件是一种惯例。 |
在 App 组件中,从 Spring Data REST 后端获取员工数组,并将其存储在该组件的 state 数据中。
React 组件包含两种类型的数据:状态 和 属性。
状态 是指组件需要自行处理的数据,同时也是可以波动和变化的数据。要读取状态,请使用 this.state;若需更新,则应使用 this.setState()。每当调用 this.setState() 时,React 将更新状态,并计算出先前状态与新状态之间的差异,然后将一系列更改应用到页面上的 DOM 中。这使得 UI 能够快速且高效地进行更新。
常见的做法是在构造函数中将所有属性初始化为空值。然后通过在 componentDidMount 中从服务器获取数据并填充属性来完成数据的加载。此后,更新可以通过用户操作或其他事件触发。
属性包括传递给组件的数据。这些属性是固定的值,不会发生变化。在创建新组件时,你需要将其赋值给相应的属性,这一点你很快就会明白。
| JavaScript不像其他语言那样锁定数据结构。你可以通过赋值来尝试修改属性,但在 React 的差分引擎中这行不通,因此应尽量避免这种做法。 |
在这个代码中,函数通过 client(一个符合 Promise 规范的 rest.js 实例)加载数据。当从 /api/employees 获取完数据后,会调用 done() 内部的函数,并根据其 HAL 文档(response.entity._embedded.employees)设置状态。参见前面中 curl /api/employees 的结构,以及它如何映射到此结构。
当状态更新时,框架会调用 render() 函数。员工状态数据作为输入参数,在创建 <EmployeeList /> React 组件时被包含进去。
以下是 EmployeeList 的定义:
class EmployeeList extends React.Component{
	render() {
		const employees = this.props.employees.map(employee =>
			<Employee key={employee._links.self.href} employee={employee}/>
		);
		return (
			<table>
				<tbody>
					<tr>
						<th>First Name</th>
						<th>Last Name</th>
						<th>Description</th>
					</tr>
					{employees}
				</tbody>
			</table>
		)
	}
}
使用 JavaScript 的 map 函数,将 this.props.employees 从员工记录的数组转换为 <Element /> React 组件的数组(稍后你将会看到这些组件)。
参见下列代码示例:
<Employee key={employee._links.self.href} data={employee} />前面的代码创建了一个新的 React 组件(注意采用大写格式),并包含两个属性:key 和 data。这两个属性的值分别来自 employee._links.self.href 和 employee。
每当您使用 Spring Data REST 时,self 链接对于给定的资源至关重要。React 需要一个唯一的标识符来识别子节点,而 _links.self.href 正好满足这一需求。 |
最后,你需要返回一个包含使用映射构建的 employees 数组的 HTML 表格,具体如下:
<table>
    <tr>
        <th>First Name</th>
        <th>Last Name</th>
        <th>Description</th>
    </tr>
    {employees}
</table>
这种简单的状态、属性和 HTML 布局展示了如何使用 React 声明性地创建一个简单且易于理解的组件。
这段代码同时包含了 HTML 和 JavaScript 吗?是的,这是 JSX。使用它不是强制性的。React 可以仅用纯 JavaScript 编写,但 JSX 语法非常简洁。由于 Babel.js 的快速开发,转换器同时提供了对 JSX 和 ES6 的支持。
担心将逻辑与结构混合在一起吗?React 的 API 鼓励使用声明式的结构结合状态和属性。而不是混杂一堆无关的 JavaScript 和 HTML,React 鼓励构建具有少量相关状态和属性的简单组件,这些状态和属性可以很好地协同工作。这样你可以查看单个组件并理解其设计。然后很容易将它们组合成更大的结构。
接下来,你需要实际定义 <Employee /> 的具体内容,如下所示:
class Employee extends React.Component{
	render() {
		return (
			<tr>
				<td>{this.props.employee.firstName}</td>
				<td>{this.props.employee.lastName}</td>
				<td>{this.props.employee.description}</td>
			</tr>
		)
	}
}
这个组件非常简单。它包含一个HTML表格行,包含了员工的三个属性。属性本身是 this.props.employee。注意,通过传入一个JavaScript对象,可以很方便地传递从服务器获取的数据。
由于此组件不管理任何状态也不处理用户输入,所以无需再做其他事情。这可能会诱惑你将其塞进上面的 <EmployeeList /> 中。不要这样做!将应用程序拆分成每个组件只负责一项工作的小型组件,将来会更容易扩展功能。
最后一步是按照以下方式渲染整个页面:
ReactDOM.render(
	<App />,
	document.getElementById('react')
)
React.render() 接受两个参数:你定义的 React 组件以及要将其注入的 DOM 节点。还记得之前在 HTML 页面中看到的 <div id="react"></div> 吗?这就是它被拾取并插入的位置。
完成以上配置后,重新运行应用程序(./mvnw spring-boot:run),然后访问 http://localhost:8080。以下图片显示了更新后的应用:

你可以看到系统加载的初始员工。
你还记得用 cURL 来创建新的条目吗?可以再使用以下命令来操作一次:
curl -X POST localhost:8080/api/employees -d "{\"firstName\": \"Bilbo\", \"lastName\": \"Baggins\", \"description\": \"burglar\"}" -H "Content-Type:application/json"
刷新浏览器,你应该会看到新的条目:

现在你可以在网站上看到它们都已列出。
回顾
在本节中:
-
你定义了一个领域对象及其相应的仓库。
-
你让 Spring Data REST 使用完整的超媒体控件来导出它。
-
你创建了两个具有父子关系的简单 React 组件。
-
你获取了服务器数据,并在简单的静态 HTML 结构中进行了渲染。
有问题吗?
-
网页是静态的。你需要刷新浏览器才能获取最新的记录。
-
该网页未使用任何超媒体控件或元数据,并且被硬编码为从
/api/employees获取数据。 -
它是只读的。虽然你可以使用 cURL 来修改记录,但网页本身没有提供任何交互功能。
我们在下一节中解决了这些问题。
第2部分 - 超媒体控制
您可以从该仓库获取代码并进行实践。本节在前一节应用程序的基础上,增加了一些额外的功能。
最初有数据……随后便有了REST
我对将任何基于 HTTP 的接口称为 REST API 的现象感到沮丧。今天的例子是 SocialSite REST API,实际上这是 RPC(远程过程调用)。它明显属于 RPC……我们需要做些什么来使 REST 架构风格在超文本约束的概念上更加清晰呢?换句话说,如果应用程序状态和其 API 不是由超文本驱动的,那么就不能将其视为 RESTful 或者 REST API。完。是不是有些手册需要修正?
https://roy.gbiv.com/untangled/2008/rest-apis-must-be-hypertext-driven
那么,超媒体控制(即超文本)到底是什么,以及如何使用它们呢?为了更好地理解这一点,让我们回顾一下REST的核心目标。
REST的概念是借鉴使万维网如此成功的理念,并将其应用于API设计中。尽管互联网规模庞大、动态性强且客户端(即浏览器)更新频率低,但万维网仍然取得了惊人的成功。Roy Fielding试图利用其中的一些约束和特性,看看是否能够促进API的生产和消费,实现类似的成功。
其中一个约束是限制使用的动词数量。在 REST 中,主要使用 GET、POST、PUT、DELETE 和 PATCH 这些动词。虽然还有一些其他的动词,但这里我们就不详细讨论了。
-
GET: 获取资源状态,不会更改系统
-
POST: 创建一个新的资源,而不指定其位置
-
PUT: 替换现有资源,并覆盖已存在内容(如有)
-
DELETE: 删除现有资源
-
PATCH:对现有资源进行部分更新(而非创建新资源)
这些是具有公认规范的标准HTTP动词。通过使用已有的HTTP操作,我们无需发明新的语言并教育整个行业。
REST 的另一个约束是使用媒体类型来定义数据格式。与其各自为政地编写自己的方言来进行信息交换,不如开发一些通用的媒体类型。其中最被广泛接受的是 HAL(Hypertext Application Language),其媒体类型为 application/hal+json。这是 Spring Data REST 的默认媒体类型。重要的一点是,REST 并没有一个集中的单一媒体类型。相反,人们可以开发并使用各种媒体类型,并根据需要进行尝试和调整。随着不同需求的出现,行业也可以灵活地适应变化。
REST 的一个重要特性是包含相关资源的链接。例如,当你查看一个订单时,RESTful API 会提供与该订单相关的客户链接、商品目录链接,以及可能的商店链接(用于显示订单来源)。在本节中,你将学习分页,并了解如何使用导航链接进行分页。
启用后端分页
为了开始使用前端超媒体控件,需要启用一些额外的功能。Spring Data REST 提供了分页支持。要使用这项功能,请按照以下方式调整仓库定义:
public interface EmployeeRepository extends PagingAndSortingRepository<Employee, Long> {

}
你的接口现在继承了 PagingAndSortingRepository,增加了设置页面大小的选项,并添加了在页面之间导航的链接。后台的其余部分保持不变(除了有一些额外预加载的数据以增加趣味性)。
重启应用程序(./mvnw spring-boot:run),查看其工作情况。然后运行以下命令(包括其输出),以查看分页功能的效果:
$ curl "localhost:8080/api/employees?size=2"
{
  "_links" : {
    "first" : {
      "href" : "http://localhost:8080/api/employees?page=0&size=2"
    },
    "self" : {
      "href" : "http://localhost:8080/api/employees"
    },
    "next" : {
      "href" : "http://localhost:8080/api/employees?page=1&size=2"
    },
    "last" : {
      "href" : "http://localhost:8080/api/employees?page=2&size=2"
    }
  },
  "_embedded" : {
    "employees" : [ {
      "firstName" : "Frodo",
      "lastName" : "Baggins",
      "description" : "ring bearer",
      "_links" : {
        "self" : {
          "href" : "http://localhost:8080/api/employees/1"
        }
      }
    }, {
      "firstName" : "Bilbo",
      "lastName" : "Baggins",
      "description" : "burglar",
      "_links" : {
        "self" : {
          "href" : "http://localhost:8080/api/employees/2"
        }
      }
    } ]
  },
  "page" : {
    "size" : 2,
    "totalElements" : 6,
    "totalPages" : 3,
    "number" : 0
  }
}
默认的页面大小是20,但我们没有那么多数据。因此,为了实际查看其效果,我们将?size=2设置为2。如预期的那样,只列出了两名员工。此外,还有first、next和last链接。还有一个self链接,它不包含任何上下文信息,包括页面参数。
如果你导航到 next 链接,还会看到一个 prev 链接。以下命令及其输出展示了如何做到这一点:
$ curl "http://localhost:8080/api/employees?page=1&size=2"
{
  "_links" : {
    "first" : {
      "href" : "http://localhost:8080/api/employees?page=0&size=2"
    },
    "prev" : {
      "href" : "http://localhost:8080/api/employees?page=0&size=2"
    },
    "self" : {
      "href" : "http://localhost:8080/api/employees"
    },
    "next" : {
      "href" : "http://localhost:8080/api/employees?page=2&size=2"
    },
    "last" : {
      "href" : "http://localhost:8080/api/employees?page=2&size=2"
    }
  },
...
当在 URL 查询参数中使用 & 时,命令行可能会将其误认为是换行符。为了避免这一问题,请用引号将整个 URL 包裹起来。 |
这看起来很不错,但当你更新前端来充分利用它时会更好。
通过关系进行导航
无需对后端进行任何额外修改,即可开始利用 Spring Data REST 自带的超媒体控件功能。接下来可以转向前端开发工作。(这也是 Spring Data REST 的一大优势:完全避免了手动维护复杂控制器代码的问题!)
| 需要注意的是,这个应用程序并不是专门为“Spring Data REST”设计的。相反,它采用了HAL、URI Templates以及其他标准。因此,使用rest.js非常简单:该库自带对HAL的支持。 |
在之前的章节中,你将路径硬编码为 /api/employees。实际上,你只需要将根路径进行硬编码,具体如下:
...
var root = '/api';
...
有了一个 handy 的 follow() 函数,你现在可以从根开始导航到你想要的地方,如下所示:
componentDidMount() {
	this.loadFromServer(this.state.pageSize);
}
在之前的章节中,加载是在 componentDidMount() 内直接完成的。 在本节中,我们使页面大小更新时可以重新加载整个员工列表成为可能。为此,我们将相关内容移到了 loadFromServer() 中,如下所示:
loadFromServer(pageSize) {
	follow(client, root, [
		{rel: 'employees', params: {size: pageSize}}]
	).then(employeeCollection => {
		return client({
			method: 'GET',
			path: employeeCollection.entity._links.profile.href,
			headers: {'Accept': 'application/schema+json'}
		}).then(schema => {
			this.schema = schema.entity;
			return employeeCollection;
		});
	}).done(employeeCollection => {
		this.setState({
			employees: employeeCollection.entity._embedded.employees,
			attributes: Object.keys(this.schema.properties),
			pageSize: pageSize,
			links: employeeCollection.entity._links});
	});
}
loadFromServer 与前一节非常类似,不过它使用了 follow():
-
传递给
follow()函数的第一个参数是用于执行 REST 调用的client对象。 -
第二个参数是起始的根URI。
-
第三个参数是一个关系数组,表示要导航的关系,每个元素可以是字符串或对象。
关系数组可以很简单,例如 ["employees"]。这意味着在第一次调用时,在 _links 中查找名为 employees 的关系(或 rel)。找到其 href 并导航到它。如果数组中还有其他关系,则重复此过程。
有时,单独使用 rel 是不够的。在这个代码片段中,还会添加一个查询参数 ?size=<pageSize>。稍后你将了解到更多可选的配置项。
获取 JSON 架构元数据
使用基于大小的查询导航到 employees 后,employeeCollection 变得可用。在上一节中,我们已在 <EmployeeList /> 内部显示了该数据。在此部分,您将执行另一次调用以获取位于 /api/profile/employees/ 的 JSON Schema 元数据。
你可以通过运行以下的 curl 命令并查看其输出来自行检查数据:
$ curl http://localhost:8080/api/profile/employees -H "Accept:application/schema+json"
{
  "title" : "Employee",
  "properties" : {
    "firstName" : {
      "title" : "First name",
      "readOnly" : false,
      "type" : "string"
    },
    "lastName" : {
      "title" : "Last name",
      "readOnly" : false,
      "type" : "string"
    },
    "description" : {
      "title" : "Description",
      "readOnly" : false,
      "type" : "string"
    }
  },
  "definitions" : { },
  "type" : "object",
  "$schema" : "https://json-schema.org/draft-04/schema#"
}
/profile/employees 路径下的元数据默认格式为 ALPS。然而,在这种情况中,你通过内容协商来获取 JSON Schema。 |
通过在 `
创建新记录
凭借这些元数据,你现在可以在用户界面上添加一些额外的控件。你可以从创建一个新的 React 组件 <CreateDialog /> 开始,如下所示:
class CreateDialog extends React.Component {

	constructor(props) {
		super(props);
		this.handleSubmit = this.handleSubmit.bind(this);
	}

	handleSubmit(e) {
		e.preventDefault();
		const newEmployee = {};
		this.props.attributes.forEach(attribute => {
			newEmployee[attribute] = ReactDOM.findDOMNode(this.refs[attribute]).value.trim();
		});
		this.props.onCreate(newEmployee);

		// clear out the dialog's inputs
		this.props.attributes.forEach(attribute => {
			ReactDOM.findDOMNode(this.refs[attribute]).value = '';
		});

		// Navigate away from the dialog to hide it.
		window.location = "#";
	}

	render() {
		const inputs = this.props.attributes.map(attribute =>
			<p key={attribute}>
				<input type="text" placeholder={attribute} ref={attribute} className="field"/>
			</p>
		);

		return (
			<div>
				<a href="#createEmployee">Create</a>

				<div id="createEmployee" className="modalDialog">
					<div>
						<a href="#" title="Close" className="close">X</a>

						<h2>Create new employee</h2>

						<form>
							{inputs}
							<button onClick={this.handleSubmit}>Create</button>
						</form>
					</div>
				</div>
			</div>
		)
	}

}
这个新组件同时包含一个 handleSubmit() 函数和预期的 render() 函数。
我们反向依次探讨这些函数,先从 render() 函数开始。
渲染
你的代码会遍历 attributes 属性中的 JSON Schema 数据,并将其转换为包含 <p><input></p> 元素的数组。
-
key仍然被 React 需要,用于区分多个子节点。 -
它是一个简单的文本输入框。
-
placeholder允许我们显示字段属于哪个用户。 -
你可能习惯了使用
name属性,但实际上并不必要。在 React 中,可以使用ref来获取特定的 DOM 节点(这一点你会很快明白)。
这体现了组件的动态特性,是由从服务器加载的数据所驱动的。
在此组件的顶级 <div> 中,包含一个锚标签和另一个嵌套的 <div>。 锚标签是用于打开对话框的按钮,而嵌套的 <div> 则是隐藏的对话框本身。在这个示例中,你使用的是纯 HTML5 和 CSS3,没有任何 JavaScript!你可以查看用于显示和隐藏对话框的 CSS 代码。在这里我们不会深入讨论这些内容。
在 <div id="createEmployee"> 内部有一个表单,包含你的动态输入字段列表和一个创建按钮。该按钮绑定了一个 onClick={this.handleSubmit} 事件处理程序。这是 React 中注册事件处理程序的方式。
| React 不会在每个 DOM 元素上创建事件处理程序。相反,它提供了一个更高效且复杂的解决方案。你无需管理该基础设施,而是可以专注于编写功能代码。 |
处理用户输入
在调用 handleSubmit() 函数时,首先会阻止事件进一步冒泡。接着,它使用相同的 JSON Schema 属性通过 React.findDOMNode(this.refs[attribute]) 方法来查找每个 <input> 元素。
this.refs 通过名称来获取特定的 React 组件。需要注意的是,你获得的是虚拟 DOM 组件。若要获取实际的 DOM 元素,则需要使用 React.findDOMNode()。
在遍历每个输入并构建 newEmployee 对象之后,我们调用一个回调来执行新员工记录的 onCreate() 方法。此方法位于 App.onCreate 内,并作为另一个属性传递给这个 React 组件。来看看那个顶级函数是如何工作的:
onCreate(newEmployee) {
	follow(client, root, ['employees']).then(employeeCollection => {
		return client({
			method: 'POST',
			path: employeeCollection.entity._links.self.href,
			entity: newEmployee,
			headers: {'Content-Type': 'application/json'}
		})
	}).then(response => {
		return follow(client, root, [
			{rel: 'employees', params: {'size': this.state.pageSize}}]);
	}).done(response => {
		if (typeof response.entity._links.last !== "undefined") {
			this.onNavigate(response.entity._links.last.href);
		} else {
			this.onNavigate(response.entity._links.self.href);
		}
	});
}
再次使用 follow() 函数导航到执行 POST 操作的 employees 资源。在这种情况下,无需应用任何参数,因此基于字符串的 rel 实例数组即可。此时会返回一个 POST 响应,使得下一个 then() 子句可以处理该响应的结果。
新记录通常会被添加到数据集的末尾。由于你正在查看某一页,因此可以合理地预期新的员工记录不会出现在当前页面上。为此,你需要获取一批具有相同页大小的新数据。done() 方法的最后一句代码返回这个承诺。
由于用户可能希望查看新创建的员工,你可以使用超媒体控件并导航到最后一条记录。
第一次使用基于 promise 的 API 吗?Promises 是一种启动异步操作并在任务完成后注册响应函数的方式。通过链式调用 Promises,可以避免“回调地狱”。请看以下流程:
when.promise(async_func_call())
	.then(function(results) {
		/* process the outcome of async_func_call */
	})
	.then(function(more_results) {
		/* process the previous then() return value */
	})
	.done(function(yet_more) {
		/* process the previous then() and wrap things up */
});查看更多详细信息,请参阅这篇关于承诺的教程。
关于承诺需要记住的一点是,then() 函数必须返回一些东西,无论是值还是另一个承诺。而done()函数不返回任何内容,并且你不能在其后链接其他内容。client(它是 rest.js 中 rest 的一个实例)和 follow 函数都返回承诺。
分页浏览数据
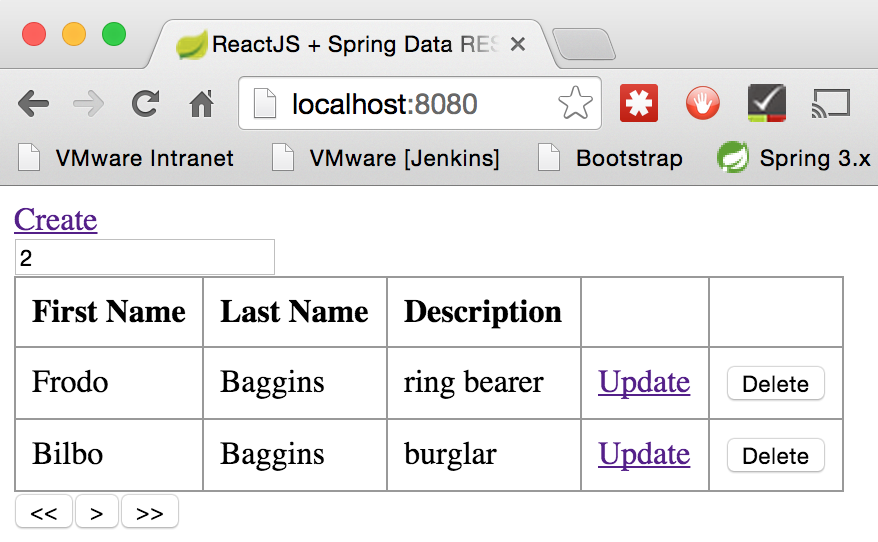
你已在后端设置好分页,并开始在创建新员工时利用它了。
在上一节中,你使用页面控件跳转到了 last 页面。如果能够将这些控件动态地应用到用户界面,并让用户按需导航会非常方便。根据可用的导航链接来动态调整控件也会很棒。
首先,让我们看一下你使用的 onNavigate() 函数:
onNavigate(navUri) {
	client({method: 'GET', path: navUri}).done(employeeCollection => {
		this.setState({
			employees: employeeCollection.entity._embedded.employees,
			attributes: this.state.attributes,
			pageSize: this.state.pageSize,
			links: employeeCollection.entity._links
		});
	});
}
这在顶部的 App.onNavigate 内部定义。同样,这样做是为了允许在顶层组件中管理 UI 的状态。将 onNavigate() 传递给 <EmployeeList /> React 组件后,编写了以下处理程序来处理点击某些按钮的操作:
handleNavFirst(e){
	e.preventDefault();
	this.props.onNavigate(this.props.links.first.href);
}

handleNavPrev(e) {
	e.preventDefault();
	this.props.onNavigate(this.props.links.prev.href);
}

handleNavNext(e) {
	e.preventDefault();
	this.props.onNavigate(this.props.links.next.href);
}

handleNavLast(e) {
	e.preventDefault();
	this.props.onNavigate(this.props.links.last.href);
}
每个函数都会拦截默认事件,防止其向上冒泡。然后会调用 onNavigate() 函数,并传入适当的超媒体链接。
你现在可以根据 EmployeeList.render 中的超媒体链接来有条件地显示控件。
render() {
const employees = this.props.employees.map(employee =>
<Employee key={employee._links.self.href} employee={employee} onDelete={this.props.onDelete}/>
);
const navLinks = [];
if ("first" in this.props.links) {
navLinks.push(<button key="first" onClick={this.handleNavFirst}><<</button>);
}
if ("prev" in this.props.links) {
navLinks.push(<button key="prev" onClick={this.handleNavPrev}><</button>);
}
if ("next" in this.props.links) {
navLinks.push(<button key="next" onClick={this.handleNavNext}>></button>);
}
if ("last" in this.props.links) {
navLinks.push(<button key="last" onClick={this.handleNavLast}>>></button>);
}
return (
<div>
<input ref="pageSize" defaultValue={this.props.pageSize} onInput={this.handleInput}/>
<table>
<tbody>
<tr>
<th>First Name</th>
<th>Last Name</th>
<th>Description</th>
<th></th>
</tr>
{employees}
</tbody>
</table>
<div>
{navLinks}
</div>
</div>
)
}与前一节一样,它仍然将 this.props.employees 转换为一系列的 <Element /> 组件。然后,它构建一个包含 HTML 按钮的 navLinks 数组。
由于 React 基于 XML,你不能在 <button> 元素中放置 <。你需要使用其编码版本。 |
然后你可以在返回的 HTML 的底部看到插入的 {navLinks}。
删除现有记录
self 链接执行 DELETE 操作。
class Employee extends React.Component {

	constructor(props) {
		super(props);
		this.handleDelete = this.handleDelete.bind(this);
	}

	handleDelete() {
		this.props.onDelete(this.props.employee);
	}

	render() {
		return (
			<tr>
				<td>{this.props.employee.firstName}</td>
				<td>{this.props.employee.lastName}</td>
				<td>{this.props.employee.description}</td>
				<td>
					<button onClick={this.handleDelete}>Delete</button>
				</td>
			</tr>
		)
	}
}
这个更新后的 Employee 组件在行的末尾添加了一个删除按钮。当点击该按钮时,会触发 this.handleDelete 方法。然后,handleDelete() 函数可以调用传递下来的回调函数,并提供相关的 this.props.employee 记录。
这再次表明在顶层组件中集中管理状态是最简单的,只需在一个地方进行。但这并不总是如此。然而,很多时候,在一个地方管理状态可以使事情更容易理清并保持简单。通过使用带有特定组件详细信息的回调(this.props.onDelete(this.props.employee)),可以非常轻松地在组件之间协调行为。 |
通过从顶部的 App.onDelete 开始追踪 onDelete() 函数,你可以了解它的工作原理。
onDelete(employee) {
	client({method: 'DELETE', path: employee._links.self.href}).done(response => {
		this.loadFromServer(this.state.pageSize);
	});
}
在基于页面的用户界面中删除记录后的行为有些复杂。在这种情况下,它会从服务器重新加载所有数据,并保持相同的页面大小,最后显示第一页。
如果你删除了最后一页的最后一條記錄,它將會跳轉到首頁。
调整页面大小
一种展示超媒体真正优势的方式是更新页面大小。Spring Data REST 会根据页面大小流畅地更新导航链接。
在 ElementList.render 的顶部有一个 HTML 元素:<input ref="pageSize" defaultValue={this.props.pageSize} onInput={this.handleInput}/>。
-
ref="pageSize"使你可以轻松通过this.refs.pageSize获取该元素。 -
defaultValue使用状态的pageSize进行初始化。 -
onInput注册了如下所示的处理程序:handleInput(e) { e.preventDefault(); const pageSize = ReactDOM.findDOMNode(this.refs.pageSize).value; if (/^[0-9]+$/.test(pageSize)) { this.props.updatePageSize(pageSize); } else { ReactDOM.findDOMNode(this.refs.pageSize).value = pageSize.substring(0, pageSize.length - 1); } }
它阻止了事件冒泡。然后,使用<input>元素的ref属性通过React的findDOMNode()辅助函数找到DOM节点并提取其值。接着检查输入是否为数字字符串来验证输入是否有效。如果是,则调用回调函数并将新的页面大小发送到App React组件。如果不是,刚刚输入的字符将被移除。
当App接收到updatePageSize()时,它会执行什么操作?让我们来看一下:
updatePageSize(pageSize) {
	if (pageSize !== this.state.pageSize) {
		this.loadFromServer(pageSize);
	}
}
由于新的页面大小值会更改所有导航链接,因此最好重新获取数据并从头开始。
将所有内容整合在一起
通过这些不错的新增功能,你的用户界面现在变得非常先进,如以下图片所示:

你可以看到页面顶部的页大小设置、每行的删除按钮以及底部的导航按钮。这些导航按钮展示了超媒体控制的一项强大功能。
在下列图片中,你可以看到 CreateDialog 带有插入到 HTML 输入占位符中的元数据。

这真正展示了使用超媒体与领域驱动元数据(JSON Schema)的强大之处。网页无需明确指定每个字段的作用,用户可以直接看到这些字段并了解如何使用它们。如果你在 Employee 域对象中添加了另一个字段,这个弹出窗口会自动显示它。
回顾
在本节中:
-
你开启了 Spring Data REST 的分页功能。
-
你不再使用硬编码的URI路径,转而采用根URI结合关系名称或“rels”。
-
你更新了用户界面,使其动态地使用基于页面的超链接控件。
-
你添加了创建和删除员工的功能,并相应地更新了用户界面。
-
你实现了页面大小的可调节性,并使用户界面能够灵活响应。
有问题吗?
你使网页变得动态了。但是,当你打开另一个浏览器标签页并访问同一应用时,一个标签页中的更改不会反映在另一个标签页中。
我们在下一节中解决这个问题。
第3部分 - 条件操作
在上一节中,你了解了如何开启 Spring Data REST 的超媒体控制功能,使 UI 通过分页进行导航,并根据更改的页面大小动态调整。你还添加了创建和删除员工的功能,并让页面相应地调整。然而,任何解决方案都不完整,如果没有考虑到其他用户在同一时间对你正在编辑的数据所做的更新。
您可以从该仓库获取代码并进行实践。本节在前一节的基础上增加了额外的功能。
使用 PUT 还是不使用 PUT?这是一个问题。
当你获取一个资源时,如果其他人对其进行了更新,该资源可能会过期。为了应对这一问题,Spring Data REST 集成了两种技术:资源版本控制和 ETag。
通过在后端对资源进行版本控制并在前端使用 ETags,可以有条件地执行 PUT 操作。换句话说,你可以检测某个资源是否已被更改,并防止 PUT 或 PATCH 覆盖他人的更新。
REST资源版本控制
为了支持资源版本控制,为需要此类保护的领域对象定义一个版本属性。以下示例展示了如何为 Employee 对象实现这一点:
@Entity
public class Employee {

	private @Id @GeneratedValue Long id;
	private String firstName;
	private String lastName;
	private String description;

	private @Version @JsonIgnore Long version;

	private Employee() {}

	public Employee(String firstName, String lastName, String description) {
		this.firstName = firstName;
		this.lastName = lastName;
		this.description = description;
	}

	@Override
	public boolean equals(Object o) {
		if (this == o) return true;
		if (o == null || getClass() != o.getClass()) return false;
		Employee employee = (Employee) o;
		return Objects.equals(id, employee.id) &&
			Objects.equals(firstName, employee.firstName) &&
			Objects.equals(lastName, employee.lastName) &&
			Objects.equals(description, employee.description) &&
			Objects.equals(version, employee.version);
	}

	@Override
	public int hashCode() {

		return Objects.hash(id, firstName, lastName, description, version);
	}

	public Long getId() {
		return id;
	}

	public void setId(Long id) {
		this.id = id;
	}

	public String getFirstName() {
		return firstName;
	}

	public void setFirstName(String firstName) {
		this.firstName = firstName;
	}

	public String getLastName() {
		return lastName;
	}

	public void setLastName(String lastName) {
		this.lastName = lastName;
	}

	public String getDescription() {
		return description;
	}

	public void setDescription(String description) {
		this.description = description;
	}

	public Long getVersion() {
		return version;
	}

	public void setVersion(Long version) {
		this.version = version;
	}

	@Override
	public String toString() {
		return "Employee{" +
			"id=" + id +
			", firstName='" + firstName + '\'' +
			", lastName='" + lastName + '\'' +
			", description='" + description + '\'' +
			", version=" + version +
			'}';
	}
}-
version字段使用了javax.persistence.Version注解,这会在每次插入或更新行时自动存储和更新一个值。
当获取单个资源(而不是集合资源)时,Spring Data REST 自动添加一个 ETag 响应头,其值为该字段的值。
获取单个资源及其头信息
在上一节中,你使用集合资源来收集数据并填充 UI 的 HTML 表。使用 Spring Data REST 时,_embedded 数据集被视为数据的预览。虽然这对于快速查看数据很有用,但要获取如 ETags 这样的头部信息,则需要单独获取每个资源。
在这个版本中,loadFromServer 更新为获取整个集合。然后你可以使用 URI 来检索每个单独的资源:
loadFromServer(pageSize) {
	follow(client, root, [ (1)
		{rel: 'employees', params: {size: pageSize}}]
	).then(employeeCollection => { (2)
		return client({
			method: 'GET',
			path: employeeCollection.entity._links.profile.href,
			headers: {'Accept': 'application/schema+json'}
		}).then(schema => {
			this.schema = schema.entity;
			this.links = employeeCollection.entity._links;
			return employeeCollection;
		});
	}).then(employeeCollection => { (3)
		return employeeCollection.entity._embedded.employees.map(employee =>
				client({
					method: 'GET',
					path: employee._links.self.href
				})
		);
	}).then(employeePromises => { (4)
		return when.all(employeePromises);
	}).done(employees => { (5)
		this.setState({
			employees: employees,
			attributes: Object.keys(this.schema.properties),
			pageSize: pageSize,
			links: this.links
		});
	});
}| 1 | follow() 函数访问 employees 集合资源。 |
| 2 | The first then(employeeCollection ⇒ …) 子句创建了一个调用来获取 JSON Schema 数据,并且有一个内部的 then 子句,用于在<App/> 组件中存储元数据和导航链接。
请注意,这个嵌入式 promise 返回了 |
| 3 | 第二个 then(employeeCollection ⇒ …) 子句将员工集合转换为一个包含每个资源 GET 承诺的数组。这一步是为了获取每个员工的 ETag 头所必需的。 |
| 4 | then(employeePromises ⇒ …) 这个子句接受 GET 承诺的数组,并使用 when.all() 将它们合并为一个单一的承诺。当所有的 GET 承诺都被解决时,这个单一的承诺才会被解决。 |
| 5 | loadFromServer 以 done(employees ⇒ …) 结尾,并使用这些数据的组合来更新 UI 状态。 |
这个链在其他地方也有实现。例如,onNavigate()(用于跳转到不同页面)现在会获取单个资源。因为它和这里的示例基本一致,所以这部分没有包括它。
更新现有资源
在本节中,你将添加一个UpdateDialog React组件来编辑现有员工的记录。
class UpdateDialog extends React.Component {

	constructor(props) {
		super(props);
		this.handleSubmit = this.handleSubmit.bind(this);
	}

	handleSubmit(e) {
		e.preventDefault();
		const updatedEmployee = {};
		this.props.attributes.forEach(attribute => {
			updatedEmployee[attribute] = ReactDOM.findDOMNode(this.refs[attribute]).value.trim();
		});
		this.props.onUpdate(this.props.employee, updatedEmployee);
		window.location = "#";
	}

	render() {
		const inputs = this.props.attributes.map(attribute =>
			<p key={this.props.employee.entity[attribute]}>
				<input type="text" placeholder={attribute}
					   defaultValue={this.props.employee.entity[attribute]}
					   ref={attribute} className="field"/>
			</p>
		);

		const dialogId = "updateEmployee-" + this.props.employee.entity._links.self.href;

		return (
			<div key={this.props.employee.entity._links.self.href}>
				<a href={"#" + dialogId}>Update</a>
				<div id={dialogId} className="modalDialog">
					<div>
						<a href="#" title="Close" className="close">X</a>

						<h2>Update an employee</h2>

						<form>
							{inputs}
							<button onClick={this.handleSubmit}>Update</button>
						</form>
					</div>
				</div>
			</div>
		)
	}

};
这个新组件不仅包含一个 handleSubmit() 函数,还有如 <CreateDialog /> 组件一样的预期 render() 函数。
我们反向依次来探讨这些函数,首先来看看 render() 函数。
渲染
此组件采用与前一节中<CreateDialog />相同的CSS和HTML技巧来显示和隐藏对话框。
它将 JSON Schema 属性数组转换为 HTML 输入数组,并用段落元素进行包装以进行样式设置。这与<CreateDialog />组件基本相同,唯一的区别在于:该组件使用 this.props.employee 来填充字段,而在 CreateDialog 组件中,这些字段是空的。
id 字段的构建方式与其他字段不同。整个用户界面中只有一个 CreateDialog 链接,但每行会显示一个单独的 UpdateDialog 链接。因此,id 字段基于 self 链接的 URI。这个 URI 会被用于 <div> 元素的 React key、HTML 锚标签以及隐藏的弹出窗口中。
处理用户输入
提交按钮链接到组件的 handleSubmit() 函数。此函数巧妙地使用了 React.findDOMNode() 和React ref 来提取弹出窗口的详细信息。
当输入值被提取并加载到 updatedEmployee 对象后,顶层的 onUpdate() 方法会被调用。这延续了 React 的单向绑定风格,即从上层组件向下层组件推送需要调用的方法。这样,状态仍然由顶层进行管理。
条件性PUT
你已经花了很大精力将版本控制嵌入到数据模型中。Spring Data REST 也已通过 ETag 响应头提供了该值。现在是时候利用它了:
onUpdate(employee, updatedEmployee) {
	client({
		method: 'PUT',
		path: employee.entity._links.self.href,
		entity: updatedEmployee,
		headers: {
			'Content-Type': 'application/json',
			'If-Match': employee.headers.Etag
		}
	}).done(response => {
		this.loadFromServer(this.state.pageSize);
	}, response => {
		if (response.status.code === 412) {
			alert('DENIED: Unable to update ' +
				employee.entity._links.self.href + '. Your copy is stale.');
		}
	});
}
带有 If-Match 请求头 的 PUT 操作会使得 Spring Data REST 检查传入的 If-Match 值是否与数据存储中的当前版本值匹配。如果不匹配,Spring Data REST 将返回一个 HTTP 412 Precondition Failed 错误。
Promises/A+ 的规范实际上将其 API 定义为 then(successFunction, errorFunction)。到目前为止,你只看到了它与成功函数一起使用的情况。在前面的代码片段中,有两个函数:成功函数调用 loadFromServer,而错误函数则显示一个关于数据过时的浏览器警告。 |
将所有内容整合在一起
现在你已经定义了 UpdateDialog React 组件,并将其成功链接到顶层的 onUpdate 函数,最后一步就是将它集成到现有组件的布局中。
上一节中创建的 CreateDialog 被放置在了 EmployeeList 的顶部,因为只有一个实例。然而,UpdateDialog 直接与特定员工绑定。因此,你可以在下面看到它被插入到 Employee React 组件中:
class Employee extends React.Component {

	constructor(props) {
		super(props);
		this.handleDelete = this.handleDelete.bind(this);
	}

	handleDelete() {
		this.props.onDelete(this.props.employee);
	}

	render() {
		return (
			<tr>
				<td>{this.props.employee.entity.firstName}</td>
				<td>{this.props.employee.entity.lastName}</td>
				<td>{this.props.employee.entity.description}</td>
				<td>
					<UpdateDialog employee={this.props.employee}
								  attributes={this.props.attributes}
								  onUpdate={this.props.onUpdate}/>
				</td>
				<td>
					<button onClick={this.handleDelete}>Delete</button>
				</td>
			</tr>
		)
	}
}this.props.employee.entity 中。这使我们能够访问 this.props.employee.headers,在那里可以找到 ETags。
Spring Data REST 还支持其他头部信息(如 Last-Modified),这些不在本系列的讨论范围内。因此,以这种方式组织你的数据是有帮助的。
.entity 和 .headers 的结构仅在使用rest.js 作为 REST 库时才相关。如果你使用其他库,则需要根据实际情况进行相应调整。 |
实战演示
要查看修改后应用程序的运行情况:
-
通过运行
./mvnw spring-boot:run来启动应用程序。 -
在浏览器中打开一个新的标签页,并导航到 http://localhost:8080。
你应该看到一个类似下方图片的页面:
-
打开弗罗多的编辑对话框。
-
在浏览器中打开另一个标签页,查看同一记录。
-
在第一个标签页中对记录进行修改。
-
尝试在第二个标签页中进行一些更改。
你应该看到浏览器标签发生变化,如下图所示。


通过这些修改,你提高了数据的完整性,避免了冲突。
回顾
在本节中:
-
你在领域模型中添加了一个
@Version字段,以实现基于 JPA 的乐观锁机制。 -
你已将前端调整为获取单个资源。
-
你将在
If-Match请求头中使用单个资源的 ETag 值,从而使 PUT 操作变为条件性操作。 -
你为列表中的每个员工编写了一个新的
UpdateDialog。
有了这个功能,很容易避免与其他用户的冲突或覆盖他们的修改。
有问题吗?
知道你在编辑一条错误的记录确实不错。但是否应该等到点击“提交”后才发现这个问题呢?
在 loadFromServer 和 onNavigate 方法中,获取资源的逻辑非常类似。你有没有发现什么办法可以避免重复代码呢?
你在构建 CreateDialog 和 UpdateDialog 输入时充分利用了 JSON Schema 元数据。你是否发现其他可以利用元数据使事物更加通用的地方?假设你想在 Employee.java 中添加五个字段,那么更新 UI 需要做什么呢?
第4部分 - 事件
在上一节中,你介绍了条件更新以避免与其他用户同时编辑相同数据时的冲突。你还学习了如何在后端使用乐观锁对数据进行版本控制。如果有人编辑了同一记录,你会收到通知,并可以刷新页面获取最新更新。
这很不错。但你知不知道更好的是:当其他人更新资源时,用户界面能自动做出反应。
您可以从该仓库获取代码并进行实践。本节在前一节应用程序的基础上,增加了一些额外的功能。
为项目添加 Spring WebSocket 支持
在开始之前,需要将一个依赖添加到项目的 pom.xml 文件中。
<dependency>
	<groupId>org.springframework.boot</groupId>
	<artifactId>spring-boot-starter-websocket</artifactId>
</dependency>
这个依赖带来了Spring Boot的WebSocket启动器。
使用Spring配置WebSockets
Spring 提供了强大的 WebSocket 支持。需要注意的是,WebSocket 是一个非常底层的协议,它主要提供了一种在客户端和服务器之间传输数据的方式。建议使用子协议(本节中为 STOMP)来编码数据和路由。
以下代码用于配置服务器端的WebSocket支持:
@Component
@EnableWebSocketMessageBroker (1)
public class WebSocketConfiguration implements WebSocketMessageBrokerConfigurer { (2)

	static final String MESSAGE_PREFIX = "/topic"; (3)

	@Override
	public void registerStompEndpoints(StompEndpointRegistry registry) { (4)
		registry.addEndpoint("/payroll").withSockJS();
	}

	@Override
	public void configureMessageBroker(MessageBrokerRegistry registry) { (5)
		registry.enableSimpleBroker(MESSAGE_PREFIX);
		registry.setApplicationDestinationPrefixes("/app");
	}
}| 1 | @EnableWebSocketMessageBroker 启用 WebSocket 支持。 |
| 2 | WebSocketMessageBrokerConfigurer 提供了一个方便的基础类来配置基本特性。 |
| 3 | MESSAGE_PREFIX 是你要添加到每个消息路由前面的前缀。 |
| 4 | registerStompEndpoints() 用于在后端配置端点,使客户端和服务器能够通过 /payroll 进行连接。 |
| 5 | configureMessageBroker() 用于配置服务器和客户端之间中继消息的代理。 |
通过此配置,你现在可以订阅 Spring Data REST 事件,并通过 WebSocket 发布这些事件。
订阅 Spring Data REST 事件
Spring Data REST 根据在仓库上的操作生成多个 应用事件。以下代码展示了如何订阅其中一些事件:
@Component
@RepositoryEventHandler(Employee.class) (1)
public class EventHandler {

	private final SimpMessagingTemplate websocket; (2)

	private final EntityLinks entityLinks;

	@Autowired
	public EventHandler(SimpMessagingTemplate websocket, EntityLinks entityLinks) {
		this.websocket = websocket;
		this.entityLinks = entityLinks;
	}

	@HandleAfterCreate (3)
	public void newEmployee(Employee employee) {
		this.websocket.convertAndSend(
				MESSAGE_PREFIX + "/newEmployee", getPath(employee));
	}

	@HandleAfterDelete (3)
	public void deleteEmployee(Employee employee) {
		this.websocket.convertAndSend(
				MESSAGE_PREFIX + "/deleteEmployee", getPath(employee));
	}

	@HandleAfterSave (3)
	public void updateEmployee(Employee employee) {
		this.websocket.convertAndSend(
				MESSAGE_PREFIX + "/updateEmployee", getPath(employee));
	}

	/**
	 * Take an {@link Employee} and get the URI using Spring Data REST's {@link EntityLinks}.
	 *
	 * @param employee
	 */
	private String getPath(Employee employee) {
		return this.entityLinks.linkForItemResource(employee.getClass(),
				employee.getId()).toUri().getPath();
	}

}| 1 | @RepositoryEventHandler(Employee.class) 标记此类以捕获与员工相关的事件。 |
| 2 | SimpMessagingTemplate 和 EntityLinks 从应用程序上下文中自动注入。 |
| 3 | @HandleXYZ 注解用于标记需要监听事件的方法。这些方法必须是公共方法。 |
每个处理器方法都会调用 SimpMessagingTemplate.convertAndSend() 通过 WebSocket 发送消息。这种发布订阅模式确保了一条消息会被发送到所有已连接的消费者。
每条消息的路由各不相同,因此可以在只保持一个 WebSocket 连接开启的情况下,将多条消息发送到客户端的不同接收者,这非常节省资源。
getPath() 使用 Spring Data REST 的 EntityLinks 来查找给定类类型和 ID 的路径。为了满足客户端的需求,这个 Link 对象会被转换为一个 Java URI,并从中提取路径。
EntityLinks 提供了几种实用方法,可以通过编程方式查找单个资源或集合资源的路径。 |
本质上,你在监听创建、更新和删除事件,并在这些操作完成后通知所有客户端。你还可以在这些操作发生之前进行拦截,例如记录日志、因某些原因阻止它们,或者为领域对象添加额外的信息。(在下一节中,我们将看到这种用法的一个方便之处。)
配置 JavaScript WebSocket
接下来,编写一些客户端代码以消费 WebSocket 事件。以下是主应用程序中引入的一个模块的代码段:
var stompClient = require('./websocket-listener')该模块如下所示:
'use strict';

const SockJS = require('sockjs-client'); (1)
require('stompjs'); (2)

function register(registrations) {
	const socket = SockJS('/payroll'); (3)
	const stompClient = Stomp.over(socket);
	stompClient.connect({}, function(frame) {
		registrations.forEach(function (registration) { (4)
			stompClient.subscribe(registration.route, registration.callback);
		});
	});
}

module.exports.register = register;| 1 | 引入 SockJS JavaScript 库,以便通过 WebSocket 进行通信。 |
| 2 | 引用 stomp-websocket JavaScript 库来使用 STOMP 子协议。 |
| 3 | 将 WebSocket 指向应用的 /payroll 端点。 |
| 4 | 遍历提供的 registrations 数组,使每个注册项能够在消息到达时订阅回调。 |
每个注册条目都包含一个 route 和一个 callback。在下一节中,你将了解到如何注册事件处理程序。
注册WebSocket事件
componentDidMount() 生命周期方法会在组件被渲染到 DOM 后被调用。这也是注册 WebSocket 事件的理想时机,因为此时组件已准备就绪并可以开始处理业务逻辑了。以下代码展示了如何进行注册:
componentDidMount() {
	this.loadFromServer(this.state.pageSize);
	stompClient.register([
		{route: '/topic/newEmployee', callback: this.refreshAndGoToLastPage},
		{route: '/topic/updateEmployee', callback: this.refreshCurrentPage},
		{route: '/topic/deleteEmployee', callback: this.refreshCurrentPage}
	]);
}
第一行与之前相同,使用页面大小从服务器获取所有员工。第二行显示了一个 JavaScript 对象数组,每个对象为 WebSocket 事件注册了路由和回调函数。
当创建新员工时,系统会刷新数据集并使用分页链接导航到最后一页。为什么要在导航到最后之前刷新数据?添加一条新记录可能会导致生成新的页面。虽然可以计算这种情况是否会发生,但这违背了超媒体的初衷。与其拼凑定制化的页面计数,不如直接使用现有的链接,并且只有在有性能驱动的原因时才采取其他措施。
当员工信息被更新或删除时,会自动刷新当前页面。更新记录时,该操作会影响到你正在查看的页面。而在当前页面删除一条记录时,系统会从下一页加载一条记录填补空缺——因此需要刷新当前页面以保持数据的一致性。
这些 WebSocket 消息不必以 /topic 开头。这是一种常见的约定,用于表示发布/订阅语义。 |
在下一节中,你可以看到执行这些操作的具体步骤。
响应WebSocket事件并更新UI状态
以下代码块包含两个回调函数,用于在接收到来自WebSocket的事件时更新UI状态。
refreshAndGoToLastPage(message) {
	follow(client, root, [{
		rel: 'employees',
		params: {size: this.state.pageSize}
	}]).done(response => {
		if (response.entity._links.last !== undefined) {
			this.onNavigate(response.entity._links.last.href);
		} else {
			this.onNavigate(response.entity._links.self.href);
		}
	})
}

refreshCurrentPage(message) {
	follow(client, root, [{
		rel: 'employees',
		params: {
			size: this.state.pageSize,
			page: this.state.page.number
		}
	}]).then(employeeCollection => {
		this.links = employeeCollection.entity._links;
		this.page = employeeCollection.entity.page;

		return employeeCollection.entity._embedded.employees.map(employee => {
			return client({
				method: 'GET',
				path: employee._links.self.href
			})
		});
	}).then(employeePromises => {
		return when.all(employeePromises);
	}).then(employees => {
		this.setState({
			page: this.page,
			employees: employees,
			attributes: Object.keys(this.schema.properties),
			pageSize: this.state.pageSize,
			links: this.links
		});
	});
}
refreshAndGoToLastPage() 使用熟悉的 follow() 函数导航到带有 size 参数的 employees 链接,并使用 this.state.pageSize。当收到响应后,你将调用上一部分中的相同 onNavigate() 函数并跳转到最后一页,在该页面可以找到新记录。
refreshCurrentPage() 也使用了 follow() 函数,但将 this.state.pageSize 应用于 size,并将 this.state.page.number 应用于 page。这会获取你当前查看的同一页,并相应地更新状态。
| 这种行为会告诉每个客户端,在发送更新或删除消息时刷新他们当前页面。然而,这些页面可能与当前事件无关。确定这一点可能会很棘手。例如,如果被删除的记录在第二页而你正在查看第三页,每条记录都会发生变化。但这是否是期望的行为呢?也许吧,也许不是。 |
将状态管理从局部更新中移除
为了简化代码对状态的管理,移除旧的方式。换句话说,提交你的 POST、PUT 和 DELETE 请求,但不要用它们的结果来更新 UI 的状态。相反,等待 WebSocket 事件返回后再进行更新。
以下代码块展示了与前一节相同但经过简化的onCreate()函数:
onCreate(newEmployee) {
	follow(client, root, ['employees']).done(response => {
		client({
			method: 'POST',
			path: response.entity._links.self.href,
			entity: newEmployee,
			headers: {'Content-Type': 'application/json'}
		})
	})
}在这里,使用follow()函数获取到employees链接,并应用POST操作。注意之前client({method: 'GET' …})没有then()或done()? 现在监听更新的事件处理程序位于你刚刚查看过的refreshAndGoToLastPage()中。
将所有内容整合在一起
./mvnw spring-boot:run),并进行尝试。打开两个浏览器标签页,并调整大小以便同时看到它们。在一个标签页中开始进行更新,观察另一个标签页会如何立即同步更新。用手机访问同一个页面。找一个朋友,请对方也做同样的事情。你可能会发现这种动态更新更加令人兴奋。
想要挑战一下吗?尝试在上一节的练习中,在两个不同的浏览器标签页中打开同一记录。试着在一个标签页中更新它,而在另一个标签页中看不到更新。如果可能的话,条件 PUT 代码仍然应该保护你。但要做到这一点可能会更复杂!
回顾
在本节中,你将:
-
配置了 Spring 的 WebSocket 支持,并使用 SockJS 作为回退方案。
-
订阅来自 Spring Data REST 的创建、更新和删除事件,以便动态更新用户界面。
-
发布了受影响的 REST 资源的 URI,并附带相应的上下文消息(例如 "/topic/newEmployee" 和 "/topic/updateEmployee" 等)。
-
在 UI 中注册 WebSocket 监听器来监听这些事件。
-
将监听器连接到处理器,以更新UI状态。
凭借所有这些功能,可以轻松地并排运行两个浏览器,并观察其中一个浏览器更新时对另一个浏览器的影响。
有问题吗?
虽然多个显示能够很好地更新,但仍需进一步优化其精确行为。例如,创建一个新用户时,所有现有用户的列表会自动移至最后。对此类情况的处理有何建议或想法?
分页很有用,但管理其状态比较棘手。在这个示例应用中,成本较低,并且 React 更新 DOM 非常高效,不会引起 UI 大量闪烁。但对于更复杂的应用程序,并非所有这些方法都适用。
在设计分页功能时,你需要决定客户端之间的预期交互,并确定是否需要进行更新。根据你的需求和系统的性能,现有的导航超媒体可能已经足够。
第5部分 - UI和API的安全保护
在上一节中,你使用 Spring Data REST 的内置事件处理器和 Spring 框架的 WebSocket 支持使应用程序能够动态响应其他用户的更新。然而,除非通过安全设置确保只有合适的用户才能访问 UI 和其背后资源,否则没有一个应用是完整的。
您可以从该仓库获取代码并进行实践。本节基于前一节的应用程序,增加了些额外功能。
将 Spring Security 添加到项目中
在开始之前,需要向项目的 pom.xml 文件中添加几个依赖项。
<dependency>
	<groupId>org.springframework.boot</groupId>
	<artifactId>spring-boot-starter-security</artifactId>
</dependency>
<dependency>
	<groupId>org.thymeleaf.extras</groupId>
	<artifactId>thymeleaf-extras-springsecurity5</artifactId>
</dependency>
这会引入 Spring Boot 的 Spring Security 启动器,并添加一些额外的 Thymeleaf 标签,以便在网页中执行安全查询。
定义安全模型
在上一节中,你已经使用了一个不错的薪资系统。在后端声明一些事项,并让 Spring Data REST 处理这些工作非常方便。接下来,你需要建立一个需要实施安全控制的系统。
如果这是一个薪资系统,只有管理人员可以访问。因此,我们从创建一个 Manager 对象开始:
@Entity
public class Manager {

	public static final PasswordEncoder PASSWORD_ENCODER = new BCryptPasswordEncoder(); (1)

	private @Id @GeneratedValue Long id; (2)

	private String name; (2)

	private @JsonIgnore String password; (2)

	private String[] roles; (2)

	public void setPassword(String password) { (3)
		this.password = PASSWORD_ENCODER.encode(password);
	}

	protected Manager() {}

	public Manager(String name, String password, String... roles) {

		this.name = name;
		this.setPassword(password);
		this.roles = roles;
	}

	@Override
	public boolean equals(Object o) {
		if (this == o) return true;
		if (o == null || getClass() != o.getClass()) return false;
		Manager manager = (Manager) o;
		return Objects.equals(id, manager.id) &&
			Objects.equals(name, manager.name) &&
			Objects.equals(password, manager.password) &&
			Arrays.equals(roles, manager.roles);
	}

	@Override
	public int hashCode() {

		int result = Objects.hash(id, name, password);
		result = 31 * result + Arrays.hashCode(roles);
		return result;
	}

	public Long getId() {
		return id;
	}

	public void setId(Long id) {
		this.id = id;
	}

	public String getName() {
		return name;
	}

	public void setName(String name) {
		this.name = name;
	}

	public String getPassword() {
		return password;
	}

	public String[] getRoles() {
		return roles;
	}

	public void setRoles(String[] roles) {
		this.roles = roles;
	}

	@Override
	public String toString() {
		return "Manager{" +
			"id=" + id +
			", name='" + name + '\'' +
			", roles=" + Arrays.toString(roles) +
			'}';
	}
}| 1 | PASSWORD_ENCODER 用于加密新密码,并在比较之前先将输入的密码加密。 |
| 2 | id、name、password 和 roles 定义了限制访问所需的参数。 |
| 3 | 自定义的 setPassword() 方法确保密码永远不以明文形式存储。 |
在设计安全层时,有一个关键点需要注意:保护敏感数据(如密码),确保它们不会被打印到控制台、记录到日志或通过 JSON 序列化导出。
-
@JsonIgnore应用于密码字段,以防止 Jackson 序列化该字段。
创建管理者的仓库
Spring Data 在管理实体方面表现出色,为什么不创建一个仓库来处理这些管理者呢?以下代码展示了如何实现:
@RepositoryRestResource(exported = false)
public interface ManagerRepository extends Repository<Manager, Long> {

	Manager save(Manager manager);

	Manager findByName(String name);

}无需继承常规的CrudRepository,因为你不需要那么多方法。相反,你需要保存数据(这也用于更新)以及查找现有用户。因此,你可以使用 Spring Data Common 提供的最小化 Repository 标记接口,它没有任何预定义的操作。
Spring Data REST 默认会自动导出它找到的所有仓库,但你 不希望 特定的仓库被暴露用于 REST 操作!为此,你可以应用 @RepositoryRestResource(exported = false) 注解来阻止其导出。这样可以防止该仓库及其元数据被提供。
链接员工与他们的经理
安全建模的最后一步是将员工与经理关联起来。在这种情况下,一名员工只能有一位经理,但一位经理可以管理多名员工。以下代码定义了这种关系:
@Entity
public class Employee {

	private @Id @GeneratedValue Long id;
	private String firstName;
	private String lastName;
	private String description;

	private @Version @JsonIgnore Long version;

	private @ManyToOne Manager manager; (1)

	private Employee() {}

	public Employee(String firstName, String lastName, String description, Manager manager) { (2)
		this.firstName = firstName;
		this.lastName = lastName;
		this.description = description;
		this.manager = manager;
	}

	@Override
	public boolean equals(Object o) {
		if (this == o) return true;
		if (o == null || getClass() != o.getClass()) return false;
		Employee employee = (Employee) o;
		return Objects.equals(id, employee.id) &&
			Objects.equals(firstName, employee.firstName) &&
			Objects.equals(lastName, employee.lastName) &&
			Objects.equals(description, employee.description) &&
			Objects.equals(version, employee.version) &&
			Objects.equals(manager, employee.manager);
	}

	@Override
	public int hashCode() {

		return Objects.hash(id, firstName, lastName, description, version, manager);
	}

	public Long getId() {
		return id;
	}

	public void setId(Long id) {
		this.id = id;
	}

	public String getFirstName() {
		return firstName;
	}

	public void setFirstName(String firstName) {
		this.firstName = firstName;
	}

	public String getLastName() {
		return lastName;
	}

	public void setLastName(String lastName) {
		this.lastName = lastName;
	}

	public String getDescription() {
		return description;
	}

	public void setDescription(String description) {
		this.description = description;
	}

	public Long getVersion() {
		return version;
	}

	public void setVersion(Long version) {
		this.version = version;
	}

	public Manager getManager() {
		return manager;
	}

	public void setManager(Manager manager) {
		this.manager = manager;
	}

	@Override
	public String toString() {
		return "Employee{" +
			"id=" + id +
			", firstName='" + firstName + '\'' +
			", lastName='" + lastName + '\'' +
			", description='" + description + '\'' +
			", version=" + version +
			", manager=" + manager +
			'}';
	}
}| 1 | manager 属性通过 JPA 的 @ManyToOne 注解进行关联。因为你没有定义需要查询该关系,所以 Manager 不需要使用 @OneToMany。 |
| 2 | 更新了工具构造函数调用以支持初始化。 |
将员工与经理进行安全管理绑定
Spring Security 提供了多种选项来定义安全策略。在本节中,你希望限制只有经理能够查看员工薪资数据,并且保存、更新和删除操作仅限于该员工的直接经理执行。换句话说,任何经理都可以登录并查看数据,但只能是特定员工的经理才能进行更改。以下代码实现了这些目标:
@PreAuthorize("hasRole('ROLE_MANAGER')") (1)
public interface EmployeeRepository extends PagingAndSortingRepository<Employee, Long> {

	@Override
	@PreAuthorize("#employee?.manager == null or #employee?.manager?.name == authentication?.name")
	Employee save(@Param("employee") Employee employee);

	@Override
	@PreAuthorize("@employeeRepository.findById(#id)?.manager?.name == authentication?.name")
	void deleteById(@Param("id") Long id);

	@Override
	@PreAuthorize("#employee?.manager?.name == authentication?.name")
	void delete(@Param("employee") Employee employee);

}| 1 | @PreAuthorize 放在接口顶部,限制只有具有 ROLE_MANAGER 角色的人可以访问。 |
在 save() 方法中,员工的经理要么是 null(即新员工尚未分配经理),要么其经理的名字与当前认证用户的名字匹配。这里使用了Spring Security 的 SpEL 表达式来定义访问权限。它自带一个方便的 ?. 属性导航器用于处理空值检查。同样重要的是,在方法参数上使用 @Param(…) 来链接 HTTP 操作与相应的方法。
在调用 delete() 方法时,如果可以直接访问员工对象,则直接操作;否则,若仅有 id,则需在应用上下文中获取 employeeRepository,执行 findOne(id) 查询,并验证经理与当前认证用户的一致性。
编写 UserDetails 服务
与安全集成的一个常见点是定义一个UserDetailsService。这是将用户的存储数据连接到Spring Security接口的方式。Spring Security需要一种查找用户以进行安全检查的方法,而这个UserDetailsService正是充当了桥梁的角色。幸运的是,使用Spring Data,这项工作非常简单:
@Component
public class SpringDataJpaUserDetailsService implements UserDetailsService {

	private final ManagerRepository repository;

	@Autowired
	public SpringDataJpaUserDetailsService(ManagerRepository repository) {
		this.repository = repository;
	}

	@Override
	public UserDetails loadUserByUsername(String name) throws UsernameNotFoundException {
		Manager manager = this.repository.findByName(name);
		return new User(manager.getName(), manager.getPassword(),
				AuthorityUtils.createAuthorityList(manager.getRoles()));
	}

}
SpringDataJpaUserDetailsService 实现了 Spring Security 的 UserDetailsService 接口。该接口包含一个方法:loadUserByUsername(),此方法用于返回一个 UserDetails 对象,以便 Spring Security 可以查询用户的信息。
由于你已经拥有一个 ManagerRepository,因此无需编写任何 SQL 或 JPA 表达式来获取所需数据。这个类会通过构造函数注入的方式进行自动装配。
loadUserByUsername() 调用了你刚才编写的自定义查找方法 findByName()。然后它填充一个实现 UserDetails 接口的 Spring Security User 实例。此外,你还使用了 Spring Security 的 AuthorityUtils 将基于字符串的角色数组转换为类型为 GrantedAuthority 的 Java List。
配置您的安全政策
应用于你仓库的 @PreAuthorize 表达式是访问规则。如果没有相应的安全策略,这些规则将无法发挥作用:
@Configuration
@EnableWebSecurity (1)
@EnableGlobalMethodSecurity(prePostEnabled = true) (2)
public class SecurityConfiguration extends WebSecurityConfigurerAdapter { (3)

	@Autowired
	private SpringDataJpaUserDetailsService userDetailsService; (4)

	@Override
	protected void configure(AuthenticationManagerBuilder auth) throws Exception {
		auth
			.userDetailsService(this.userDetailsService)
				.passwordEncoder(Manager.PASSWORD_ENCODER);
	}

	@Override
	protected void configure(HttpSecurity http) throws Exception { (5)
		http
			.authorizeRequests()
				.antMatchers("/built/**", "/main.css").permitAll()
				.anyRequest().authenticated()
				.and()
			.formLogin()
				.defaultSuccessUrl("/", true)
				.permitAll()
				.and()
			.httpBasic()
				.and()
			.csrf().disable()
			.logout()
				.logoutSuccessUrl("/");
	}

}
这段代码较为复杂,因此我们将分步进行讲解,先介绍其中的注解和 API,然后再讨论其定义的安全策略。
| 1 | @EnableWebSecurity 告诉 Spring Boot 放弃其自动配置的安全策略,并采用当前定义的策略。对于快速演示而言,自动配置的安全策略是足够的。但是,对于任何实际的应用场景,建议你自己编写安全策略。 |
| 2 | @EnableGlobalMethodSecurity 启用方法级别的安全功能,利用 Spring Security 的高级@Pre 和 @Post 注解。 |
| 3 | 它继承了WebSecurityConfigurerAdapter类,这个类在编写安全策略时非常有用。 |
| 4 | 它通过字段注入自动装配 SpringDataJpaUserDetailsService,然后通过 configure(AuthenticationManagerBuilder) 方法将其接入。同时还会设置 Manager 中的 PASSWORD_ENCODER。 |
| 5 | Pivotal 安全策略是用纯 Java 编写并通过 configure(HttpSecurity) 方法调用实现的。 |
安全策略要求使用之前定义的访问规则来授权所有请求。
-
antMatchers()中列出的路径将获得无条件访问权限,因为没有必要限制静态 web 资源。 -
任何不符合该策略的情况都将被归类为
anyRequest().authenticated(),这意味着它需要进行身份验证。 -
设置好这些访问规则后,Spring Security 配置为使用基于表单的身份验证(默认成功后跳转至
/),并允许访问登录页面。 -
BASIC登录已禁用CSRF功能,主要用于演示目的。不建议在未进行仔细分析的情况下将其应用于生产环境。
-
注销后,用户将被引导至
/。
| BASIC认证在使用curl进行实验时非常方便。然而,使用curl访问基于表单的系统会比较困难。需要注意的是,通过HTTP(而不是HTTPS)进行任何机制的身份验证都会让你面临凭据被窃取的风险。CSRF是一个很好的协议,默认情况下应该保持启用状态。在这里将其禁用是为了便于与BASIC和curl进行交互。在生产环境中,最好将其开启。 |
自动添加安全详情
良好的用户体验包括应用程序能够自动应用上下文。例如,如果已登录的经理创建了一个新的员工记录,那么该经理拥有这个记录是很合理的。使用 Spring Data REST 的事件处理器,用户无需显式地进行链接,并且可以避免将记录分配给错误的经理。SpringDataRestEventHandler 为我们处理了这一点:
@Component
@RepositoryEventHandler(Employee.class) (1)
public class SpringDataRestEventHandler {

	private final ManagerRepository managerRepository;

	@Autowired
	public SpringDataRestEventHandler(ManagerRepository managerRepository) {
		this.managerRepository = managerRepository;
	}

	@HandleBeforeCreate
	@HandleBeforeSave
	public void applyUserInformationUsingSecurityContext(Employee employee) {

		String name = SecurityContextHolder.getContext().getAuthentication().getName();
		Manager manager = this.managerRepository.findByName(name);
		if (manager == null) {
			Manager newManager = new Manager();
			newManager.setName(name);
			newManager.setRoles(new String[]{"ROLE_MANAGER"});
			manager = this.managerRepository.save(newManager);
		}
		employee.setManager(manager);
	}
}| 1 | @RepositoryEventHandler(Employee.class) 标记此事件处理器仅适用于Employee对象。而@HandleBeforeCreate注解则提供了一个机会,在Employee记录写入数据库之前对其进行修改。 |
在这种情况下,你可以通过查找当前用户的安全上下文获取用户名,然后使用 findByName() 查找关联的经理并将其应用于该角色。如果系统中尚未存在该人员,则需要一些额外的代码来创建一个新的经理。然而,这部分代码主要是为了支持数据库初始化,在实际生产环境中应被移除,并依赖于 DBA 或 Security Ops 团队来维护用户数据存储。
预加载管理数据
加载管理人员并将员工与其关联起来非常简单:
@Component
public class DatabaseLoader implements CommandLineRunner {

	private final EmployeeRepository employees;
	private final ManagerRepository managers;

	@Autowired
	public DatabaseLoader(EmployeeRepository employeeRepository,
						  ManagerRepository managerRepository) {

		this.employees = employeeRepository;
		this.managers = managerRepository;
	}

	@Override
	public void run(String... strings) throws Exception {

		Manager greg = this.managers.save(new Manager("greg", "turnquist",
							"ROLE_MANAGER"));
		Manager oliver = this.managers.save(new Manager("oliver", "gierke",
							"ROLE_MANAGER"));

		SecurityContextHolder.getContext().setAuthentication(
			new UsernamePasswordAuthenticationToken("greg", "doesn't matter",
				AuthorityUtils.createAuthorityList("ROLE_MANAGER")));

		this.employees.save(new Employee("Frodo", "Baggins", "ring bearer", greg));
		this.employees.save(new Employee("Bilbo", "Baggins", "burglar", greg));
		this.employees.save(new Employee("Gandalf", "the Grey", "wizard", greg));

		SecurityContextHolder.getContext().setAuthentication(
			new UsernamePasswordAuthenticationToken("oliver", "doesn't matter",
				AuthorityUtils.createAuthorityList("ROLE_MANAGER")));

		this.employees.save(new Employee("Samwise", "Gamgee", "gardener", oliver));
		this.employees.save(new Employee("Merry", "Brandybuck", "pony rider", oliver));
		this.employees.save(new Employee("Peregrin", "Took", "pipe smoker", oliver));

		SecurityContextHolder.clearContext();
	}
}
唯一的问题是在此加载器运行时,Spring Security 的访问控制规则会完全生效。因此,为了保存员工数据,你需要使用 Spring Security 的 setAuthentication() API 来为此加载器指定正确的用户名和角色进行身份验证。最后,安全上下文会被清除。
探索你的受保护的REST服务
完成所有这些修改后,你可以通过运行 ./mvnw spring-boot:run 启动应用,并使用以下 curl 命令查看修改结果及其输出:
$ curl -v -u greg:turnquist localhost:8080/api/employees/1
*   Trying ::1...
* Connected to localhost (::1) port 8080 (#0)
* Server auth using Basic with user 'greg'
> GET /api/employees/1 HTTP/1.1
> Host: localhost:8080
> Authorization: Basic Z3JlZzp0dXJucXVpc3Q=
> User-Agent: curl/7.43.0
> Accept: */*
>
< HTTP/1.1 200 OK
< Server: Apache-Coyote/1.1
< X-Content-Type-Options: nosniff
< X-XSS-Protection: 1; mode=block
< Cache-Control: no-cache, no-store, max-age=0, must-revalidate
< Pragma: no-cache
< Expires: 0
< X-Frame-Options: DENY
< Set-Cookie: JSESSIONID=E27F929C1836CC5BABBEAB78A548DF8C; Path=/; HttpOnly
< ETag: "0"
< Content-Type: application/hal+json;charset=UTF-8
< Transfer-Encoding: chunked
< Date: Tue, 25 Aug 2015 15:57:34 GMT
<
{
  "firstName" : "Frodo",
  "lastName" : "Baggins",
  "description" : "ring bearer",
  "manager" : {
    "name" : "greg",
    "roles" : [ "ROLE_MANAGER" ]
  },
  "_links" : {
    "self" : {
      "href" : "http://localhost:8080/api/employees/1"
    }
  }
}
这比你在第一部分看到的提供了更多的细节。首先,Spring Security 启用了多种 HTTP 协议来防范各种攻击向量(如 Pragma、Expires、X-Frame-Options 等)。此外,你使用 -u greg:turnquist 命令发送 BASIC 凭证,这会生成 Authorization 标头。
在所有头部信息中,你可以找到你版本化资源的 ETag 头部。
最后,在数据本身中可以看到一个新的属性:manager。它包含了名称和角色,但不包括密码(因为对该字段使用了 @JsonIgnore)。由于 Spring Data REST 没有导出该仓库,其值内联在此资源中。在下一节更新 UI 时你会用到这一点。
在UI中显示经理信息
完成所有后端修改后,现在你可以开始更新前端内容了。首先,你可以在 <Employee /> React 组件中显示员工的经理。
class Employee extends React.Component {

	constructor(props) {
		super(props);
		this.handleDelete = this.handleDelete.bind(this);
	}

	handleDelete() {
		this.props.onDelete(this.props.employee);
	}

	render() {
		return (
			<tr>
				<td>{this.props.employee.entity.firstName}</td>
				<td>{this.props.employee.entity.lastName}</td>
				<td>{this.props.employee.entity.description}</td>
				<td>{this.props.employee.entity.manager.name}</td>
				<td>
					<UpdateDialog employee={this.props.employee}
								  attributes={this.props.attributes}
								  onUpdate={this.props.onUpdate}
								  loggedInManager={this.props.loggedInManager}/>
				</td>
				<td>
					<button onClick={this.handleDelete}>Delete</button>
				</td>
			</tr>
		)
	}
}
这仅仅添加了一列来显示 this.props.employee.entity.manager.name。
过滤 JSON 架构元数据
如果一个字段出现在数据输出中,可以安全地假设它在 JSON Schema 的元数据中有一个对应的条目。你可以在下面的摘录中看到这一点:
{
	...
    "manager" : {
      "readOnly" : false,
      "$ref" : "#/descriptors/manager"
    },
    ...
  },
  ...
  "$schema" : "https://json-schema.org/draft-04/schema#"
}
你不希望人们直接编辑 manager 字段。由于它是内联的,应将其视为只读属性。为了从 CreateDialog 和 UpdateDialog 中过滤掉内联条目,你可以在 loadFromServer() 方法中获取 JSON Schema 元数据后删除这些条目:
/**
 * Filter unneeded JSON Schema properties, like uri references and
 * subtypes ($ref).
 */
Object.keys(schema.entity.properties).forEach(function (property) {
	if (schema.entity.properties[property].hasOwnProperty('format') &&
		schema.entity.properties[property].format === 'uri') {
		delete schema.entity.properties[property];
	}
	else if (schema.entity.properties[property].hasOwnProperty('$ref')) {
		delete schema.entity.properties[property];
	}
});

this.schema = schema.entity;
this.links = employeeCollection.entity._links;
return employeeCollection;
这段代码移除了URI关系和$ref条目。
防范未授权访问
在后端配置了安全检查之后,如果有人尝试未经授权更新记录,你可以添加一个处理器来处理这种情况。
onUpdate(employee, updatedEmployee) {
	if(employee.entity.manager.name === this.state.loggedInManager) {
		updatedEmployee["manager"] = employee.entity.manager;
		client({
			method: 'PUT',
			path: employee.entity._links.self.href,
			entity: updatedEmployee,
			headers: {
				'Content-Type': 'application/json',
				'If-Match': employee.headers.Etag
			}
		}).done(response => {
			/* Let the websocket handler update the state */
		}, response => {
			if (response.status.code === 403) {
				alert('ACCESS DENIED: You are not authorized to update ' +
					employee.entity._links.self.href);
			}
			if (response.status.code === 412) {
				alert('DENIED: Unable to update ' + employee.entity._links.self.href +
					'. Your copy is stale.');
			}
		});
	} else {
		alert("You are not authorized to update");
	}
}
你有代码来捕获 HTTP 412 错误。这段代码还会拦截 HTTP 403 状态码,并提供相应的警告。
你也可以为删除操作做相同的事情:
onDelete(employee) {
	client({method: 'DELETE', path: employee.entity._links.self.href}
	).done(response => {/* let the websocket handle updating the UI */},
	response => {
		if (response.status.code === 403) {
			alert('ACCESS DENIED: You are not authorized to delete ' +
				employee.entity._links.self.href);
		}
	});
}
这采用了类似的编码方式,并包含了一个定制的错误消息。
在UI中添加一些安全细节
为了完善这个版本的应用程序,最后一步是显示当前登录的用户,并提供一个注销按钮。为此,在index.html文件中将新的<div>添加到react <div>之前:
<div>
    Hello, <span id="managername" th:text="${#authentication.name}">user</span>.
    <form th:action="@{/logout}" method="post">
        <input type="submit" value="Log Out"/>
    </form>
</div>
将所有内容整合在一起
要查看前端的变化,请重启应用程序并访问 http://localhost:8080。

你可以看到新增加的“经理”列。翻几页,找到由oliver管理的员工,如下图所示:

点击更新,进行一些修改,然后再点击一次更新。此时应会出现如下提示框:

如果你尝试删除,它应该会显示类似的错误消息。如果你创建一个新员工,该员工应被分配给你。
回顾
在本节中,你将:
-
定义了
定义了manager的模型,并通过一对一的关系将其关联到一名员工。manager的模型,并通过一对多的关系将其关联到一名员工。 -
为管理人员创建了一个仓库,并告知Spring Data REST不要进行导出。
-
为员工仓库制定了一套访问规则,并编写了相应的安全政策。
-
编写了另一个 Spring Data REST 事件处理器,用于在创建事件发生前捕获事件,并将当前用户分配为员工的经理。
-
更新了用户界面,显示员工的经理,并在执行未经授权的操作时弹出错误提示。
有问题吗?
网页已经变得相当复杂。但如何管理关系和内联数据呢?现有的创建和更新对话框可能不太适用,可能需要一些自定义表单来解决这些问题。
管理人员可以访问员工数据。员工是否也应该有访问权限?如果添加更多细节(如电话号码和地址),你会如何建模这些信息?你该如何授予员工访问系统的权限,以便他们可以更新特定字段?页面上还有哪些超媒体控件会很有用?